Archive | buying woodworking equipment RSS feed for this section

Klingspor to the rescue… again!

4 Nov

As I mentioned earlier, I bought a Ridgid combination spindle sander/ belt sander recently. I had decided that it was a necessary tool. I’ve worked with belt sanders at both of my jobs in the woodworking industry and they shave so much time off of certain tasks that I finally convinced myself to just make room in the shop for it.

So I made the room.

While I was at it I picked up replacement sanding drums and belts. That way I’d be prepared with different grits, and fully loaded for my upcoming projects. I’ve already used it so much that I feel the tool is worth it’s weight in gold.

To my chagrin the belts that I bought at Homedepot (Freud Diablo brand) were loose even after sliding the tension lever all the way home. This led to the belt flapping about and then sliding down and sanding the inside of the machine! I promptly turned off the sander and adjusted the knob that repositions the belt up or down the assembly. This didn’t help the situation at any point because the belt was too loose. The package said it was the right size 24″x4″. Yet when I put the original belt(that came with the sander) back onto the machine it tracked perfectly with no problems- I knew then that it wasn’t my machine. So back to the store the belts went for a full refund.
I recently bought sanding discs for my ROS (random orbit sander) from Klingspor so that’s where I turned next. I did some quick internet research to see if other Ridgid belt sander owners had used Klingspor belts successfully. I did find confirmation of that so I ordered some belts. I received the belts a week or so ago and tried them out- worked perfectly!

The most amazing part is the deal I got! I’m glad the first belts went back to the store because  just 2 belts had cost $12. Klingspor offers a deal on a combo pack of  30 belts for $20 (6 assorted grits). I still can’t believe what a great deal that is! I’ll be sanding for a long while on those 30 belts! They appear to be better quality than the belts I got from Homedepot, plus I have a crepe stick to clean the paper with, so I’m all set. Thanks Klingspor!

Now I have 5 of each of the following grits: 60,80,100,120,150,180.

Next thing this sander needs is a dust shroud,  which the machine doesn’t come with, nor does the manufacturer produce one. Luckily I found one that Kevin May made here. It seems perfect so I’ll probably just model mine after his as closely as possible. Kevin’s shroud design is easily removed, and also has a hinged part that swings out of the way to access the spindle end of the edge sander without removing the shroud.

On the job front I am sill twaiting for the final word, things are tense. I should know sometime this coming week- possibly Monday- but I’m trying not to hold my breath!

P.S. Klingspor  sells more than just sandpaper!

Finally, my shop has a dust separator! I bought one that fits regular sized buckets because I happened to have one on hand. I wasn’t ready to fork over $60-$90 for a Dust Right or Oneida version, so this $15 lid fit the bill very well. Can’t wait to try it out.

Sanding is in my future… sanding with ease

5 Sep

My new purchases arrived. I can’t wait to get this sander fired up!

Here is the complete vibration control ROS kit. It comes with an extra handle to mount to the front (which I added on right away), a 5″ & 6″ disc, a dust canister and a vacuum adapter. And a token sanding disc in each size if you wanted to make dust right out of the box.

I turned it on and ran the speed high and low to see the difference and was quite impressed with the range. I have yet to test it on wood, but I will report back after several uses to make sure I have a good idea of how it performs.

As I have mentioned in earlier posts, I bought this sander after much research. The vibration control being the main selling point for me and my achy joints. I also hadn’t heard of ROS having multiple disc sizes so that won me over even more. It was a costly affair at $289 but one that I feel will be paying my joints dividends for many years. I’ve suffered enough with other professional grade sanders used in industry to know that this is a tool I did NOT want to skimp on.

One last detail…
The only thing left to research after I’d locked in my ROS choice, were sanding discs. I turned to my online fount of knowledge for more guidance.  My subscription to FWW online has been an incredible value. They have unbiased reviews of all kinds of tools in their database. I always turn to FWW for tool reviews and the like. As luck would have it, they just so happened to have a review on sanding discs for Random Orbit Sanders.

The results were surprising! The discs I’d used in both of my workplaces rated good on the chart, but a disc that I’d never heard of that was priced lower than the more popular brands rated the best! I re-read the results to be sure and then began my search for discs that were rated as best value, and best overall performers: Klingspor VD900 (also identified PS33)

I heard that some woodcraft stores sell Klingspor, but I don’t live near a woodcraft store. I also know from previous visits that I hadn’t seen Klingspor brand discs at my local woodworking stores. So I looked a while longer on the internet and found that Klingspor sells directly through their “Woodworking Shop” store! http://www.woodworkingshop.com  The thing to note is that not all of the Klinspor discs rated the same in the FWW review, so only buy the grey coloured discs that are marked ps33 and/or  VD900 if you’re in the market for discs that last.

I opted for 50 disc combo packs in both the 5″ and 6″ sizes. They include 10 discs of 5 different grits, 60,80,100,120,150. Then I threw in some clearance discs that probably don’t have the same performance rating but for about $8 for 50 discs I thought I’d run the risk and cover my grits at the same time, I got 240, and 320.

I also threw in a sanding block with hook & loop that would fit the 6″ discs…

… and a hand sanding pad with hook & loop that would fit the 5″ discs

I look forward to testing out the discs along with my new sander- probably the first time I’ve ever looked forward to sanding!

Free shipping… damn you!

17 Jun

I’ve been noticing some holes in my tool collection and supplies while working on recent projects. I decided that I definitely need some more clamps. I think I’ve settled on Bessey revo K-body Jr‘s for that. I also decided that some professional grade chisels would go a long ways to improving my quality of life in the shop. After some research I’ve decided to go with Lie Nielsen chisels. The hard A2 steel and socket design(which prevents the handles from splitting after a pounding), and the low profile sides (perfect for working on dovetails) were key factors, but what cinched it for me was that Lie Nielsen’s set has true imperial measurements.  I noticed though that there are no savings if you get a set, so I’ll probably get them individually. I was fixing to purchase clamps or chisels next…

Then Lee Valley came along and foiled my plans by announcing free shipping on orders over $40. I’d been waiting for just such an occasion to make some purchases from them.  This round of tool buying felt a little bit like a game of rock paper scissors. Lee Valley won this round, but most likely won’t win the next.

Welcome home, welcome home.

24 lil’ blades. I plan to test out some maquetry on my scroll saw so I got some skip tooth 2/0 blades. For versatility sake I bought some spiral blades for the scroll saw as they cut with any feed direction.

To carry out said marquetry trials, I threw in some veneer tape so that I can properly assemble my pieces.

I’ve been longing for this saw- oh the dowels I’ve attempted to cut flush with a surface… the horrors. I have some peace now that this lives on my peg board.

My trim router badly needed this 1/4″ up cut spiral bit. I’ll use it to waste out material for inlays and possibly for mortising or grooves on the router table.

I have a tiny inventory of files and NO file brush. In an effort to save money I opted for a file/rasp in one.  I’m not sure I made the right choice- it seems very small, I’d have to use very short strokes. I guess I’ll find out once I use it. The file brush was an excellent value though- better than the ones at work even!

Lee Valley claims that this Norton water stone sharpens A2 steel noticeably faster than some other water stones. I bought a 220/1000 grit stone. I have a 4000 stone already.

The stanley planes I own have a thin film of rust on them. I wanted something a little gentler than the (rust-free)product I own to take care of that.

This little kit will serve me well! I have many more jigs and fixtures to make for the shop and I sure as heck don’t want to drop everything to go buy hardware every time I need to slap a jig together.

Looking forward to trying this out on some tables I’m making.

I confess that I had about ten other items if not more that I removed from my basket before checking out. Lee Valley is dangerous. Dangerous. That’s right I said it twice- you can thank their affiliation with Veritas for that.

Next I’ll post an update on other things going on in the shop. Thanks for reading,  happy tool purchasing- I mean happy woodworking.

Fix this machine… interwebs… and aren’t rules meant to be broken?

7 Apr

Not a couple days after posting on how to buy used tools I went out and purchased a used scroll saw.

And didn’t I go and break some of my own rules because I was too excited about the price being lower than anything I’d seen. It was a 20″ Dewalt scroll saw.

This is the exact model. Picture it more “used” though.

I did my research first, that went fine. I found out that Dewalt was what I wanted from reading reviews, and 20″ was sufficient for me. I saw that retail would be too costly, and opted for used. I was super excited  when I saw that one had turned up on my local classifieds website. No other dewalts had turned up. And it was a great price; $175 when it sells for around $500 retail. I couldn’t find much info on assessing scroll saws, so  I went in with the general idea of checking that it worked, the motor was fine, and that the cut line wasn’t misshapen by a blade that was off alignment.

Normally I go to see a potential tool with the assumption that it might be in bad shape and I shouldn’t get my hopes up. This time I was TOO excited. I didn’t insist on testing the tool, I was content with watching the owner do a test cut in front of me. I inspected the cut and thought, well the motor works, the cut is good, what else do I need to make a decision?! So I bought it. A direct quote from my blog post…” I also ALWAYS insist on testing the item. If the person doesn’t want me to touch it, or limits my time assessing it-that’s a red flag.”

I got home and plugged it in- excited to play around. When I turned up the speed above number 5 I started to hear a distinct clacking sound. I was upset. I thought ” oh &%#$ I’ve been had!”. I proceeded to get upset at myself for not following my own rules. Then I started to face the music and opened up the scroll saw to get down to fixing the problem. When I opened it up it wasn’t obvious what the problem was and how to solve it. No loose or errant parts.

So I turned to the internet as I often do in such times and I found the answer within 4 minutes! So I thought I would share it as it might help others!

Apparently this knocking, clacking or clicking is common on dewalt scroll saws and the solution takes 10minutes to implement. This is the link to the forum that had a posting on the topic, and this  is the link that ultimately has the answer. He also posted a parts diagram list here.

Turns out that if you remove the front assembly you gain access to the rods that propel the blade up and down like a sewing machine. The top rod simply is too short and is knocking into the housing on the up swing. To lengthen the rod you give it one full counter clockwise turn, replace the assembly and you’re done! The article says that you repeat the counter clockwise turn until it does work, but just the one turn worked for me.

Funny enough, I probably wouldn’t have bought the machine if I’d followed my usual ways and tested it myself and heard the clacking. I also would have missed out on a perfectly healthy machine at a good price as it turned out to be a simple fix. Sometimes things just work out! EXCEPT I missed an excellent bargaining point to bring the price down further.

Lesson to all you out there shopping for used tools– testing a machine/tool yourself, and taking your time assessing it no matter how excited you are really keeps you from getting the wool pulled over your eyes. People will try to trick you!

Buying used tools… how to come away smiling

31 Mar

Since I was asked recently about buying tools second hand, here’s some info on how I get some great deals.

First things first

When I see the need for purchasing a tool, I do research. I look up the brands that are popular, the stores that are closest, and check the retail prices. Then I choose the quality range that I want to target, most times I don’t go absolute best quality, but mid-range, or bottom mid-range. From there I decide whether buying the tool new is the best option. In most cases if the tool is $150 and under I feel better getting it brand new with a warranty / guarantee than buying used. That is if I plan on using the tool often enough. If it’s a one off project then I might consider buying used for tools that go for $150 and under. Sometimes I also veto buying used because I want that particular machine to have a predictably long and accurate life. Buying used can be risky after all in terms of how much life is left in the tool (for power tools anyway).

Pricing it right…

Once I’ve decided that I want to buy used I figure out the MOST current and available price for the tool brand new (retail value). Once I have this number, I halve it. The tool should go for half of the retail value when buying used, unless it’s a tool that has a high resale value or is almost new. I confirm the “used” price by hitting the classified ad websites and looking up that specific tool and/or similar items. I average out my findings to get my final estimated value of the tool.

But which one do I choose…

Much like choosing a car, brands and year models play a large role in weeding out the good from the bad. Since I have a subscription to a woodworking website, I search for a review on the different brands of the tool and go from there. Another way to source this info is to ask “tool people” in your network which brands are reliable. My FAVOURITE way to choose between brands though, and I do this to validate info I may already have, is to search the web for customer reviews on retail websites. If there are enough customer reviews, and you can see patterns in them, then you know the reviews are reliable. For instance if several people are voicing complaints about a faulty part on the tool, then you know the product isn’t prime. But if the pattern is that most people couldn’t be happier, then bingo!

Buy local in order to run through your checklist…

I always try to find a guide of “things to look for when buying used” about each tool I purchase. The woodworking subscription I have has been very fruitful in this regard, but message boards can help, your friend network again can help, and general searches on the web. I jot down a small list that fits in the palm of my hand for when I go to see the tool. I ask the hard questions and see if the person selling the item is flippant or giving direct responses.  I also ALWAYS insist on testing the item. If the person doesn’t want me to touch it, or limits my time assessing it-that’s a red flag.

General check list for power tools or stationary machines 

Plug it in, see if it works well- test it with wood you brought

Are all the parts there and in good condition- or will you need to repair or replace some

Are the bearings in good shape, are there any grinding sounds when turned manually

Are there sparks coming out of the motor housing or burning smells

Are the belts in good condition

Is there  runout, slop, or do the settings on the machine not hold well

If there are flat tables on the tool, check to see that they really are flat

Haggling

This is a tough one. My general way of going about this is to figure out if there is a bargaining point to be had or if the tool is actually in great shape and well within the seller’s asking price. I usually ask why the seller is selling the item, this question is great for haggling- it makes sellers squirm and sometimes the seller will reveal more than they should have, but this is also good for you as you don’t want to buy something with any hidden problems. If there is a key issue that I am truly worried about I ask for a lower price. Or if my budget is tight. Generally if I find the item is well worth the asking price I don’t talk them down because I can’t justify it, and the seller usually knows that they could find someone else in a heart beat to sell to. But you get a feel for how negotiable a price is, sometimes it’s obvious. When I do haggle, I bring up the undesired issue as a bargaining point, and then make an offer. But before hand I go through my checklist, and give myself time to reflect on all of the variables. Strangely this silence from me is intimidating to sellers as they don’t know what I’m thinking. It tends to work in my favour. They want to sell after all, and the sooner the better.  If the seller accepts my offer then I follow through, if they counter offer I usually ask if it’s really their best offer. Sometimes they go lower, sometimes not, usually I accept their counter offer. But I will say; Haggling works best if you truly could walk away from the deal if the price is wrong. 

Once upon a Saw Stop… my Saw Stop review

27 Mar

First… the elephant

I have my reasons for choosing Saw Stop. I respect other’s reasons for not buying Saw Stop, and  I certainly respect those who don’t want governments to dictate whether their saw will have  saw stop technology.

I know how to avoid accidents on table saws, I’ve learnt all of the safe procedures. But the fact remains that table saws scare me. And I know that I am human, and human error is  a real thing. I don’t expect that having air bags in a car guarentees that you will not be seriously injured in a crash, but that they will improve the odds that you will be less badly injured than without. I imagine the Saw Stop is similar, I don’t really expect I’d be lightly grazed if I had a severe kickback and my hand went into the blade, but I hope my injury would be less severe than without the technology. In this respect I understand why goverments would want to interfere, it saves them money in the bigger scheme of things if people are less badly injured on table saws. It’s business for them. But for us woodworkers, it’s personal. We each have our own way of doing things. Ask a woodworker how they would go about something and you’ll likely get a different answer from each. From the tool, to the procedure, it’s all personal.

My Saw Stop 

Okay so now that the elephant in the room has been addressed ( I come in peace)  it’s time to get down to the review!


This is the model I purchased.
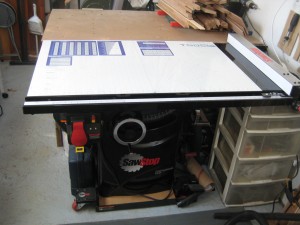
It's a 10" Professional Cabinet Saw 1.75hp 110v

It came with an industrial mobile base, and a 30″ premium fence. A blade guard came standard, as did a separate riving knife/ splitter.


Before buying… key points about the Saw Stop

I did research before purchasing, I’d read up on Saw Stop months before finally giving in. I still didn’t realize several details about the saw until I actually had it in my shop though. So here are some of those details.

You CAN cut wet wood and/or aluminum. On bypass mode. It’s simple to do once you memorize how to initiate bypass mode. I cut particle board that had been sitting in snow and I sliced right through wet patches. Bypass mode is deactivated as soon as you turn off the blade after your cut(s). The saw automatically returns to sensing flesh/metal/wet wood. After cutting conductive materials in bypass mode, you must check the blade for remnants of the conductive material. 

You can test materials to see if they are conductive. The system continues to monitor for flesh and other conductive materials in bypass mode. This means you can take test cuts of a dubious material in bypass mode, and if the red light flashes during the cut you will know that the brake would have activated if you had cut this conductive material in normal mode. If the red light doesn’t come on you know you can cut the material without triggering the brake.

You CAN cut green wood with the safety system activated. Saw Stop claims most wet or green woods can be cut without triggering the brake. And in fact the system is supposed to shut itself off  without use of the brake and display an overload code when the wood is too wet/green. BUT do the conductivity test first to make certain. And there is a warning that cutting really wet woods could interfere with detecting flesh.

The saw does a system check when you first power it on and the blade will not start if the system check reveals ANY errors (such as a brake cartridge installed incorrectly). The system is constantly checking itself also. This means rest assured the saw is detecting flesh and all systems are go when the blade  starts. The one exception being bypass mode.

The blade senses flesh even  in standby mode, when the blade is not on. The blade will not start until you remove your hand or any metal object from contacting the blade. I  found this out because I was squaring my blade with a metal square, and I noticed a red light started blinking whenever I touched the blade, and it would blink a beat or two after I’d removed the square from the blade. The blade wouldn’t start until the red blinking ceased.

Do not buy blades that have rust coatings on the teeth. Coatings such as lacquer on the teeth of the blade could prevent the saw stop system from detecting your flesh, or could slow the reaction time. I called customer service and they clarified that it is only the teeth that matter here, blades such as Freud’s that have the red coating on the body of the blade are okay.

The blades you buy must be at least 3/32 wide. This doesn’t prevent you from buying thin kerf blades, as a matter of fact I just bought one, but I made sure that it was 3/32 wide before buying. The force of the brake when it impacts the blade could cause problems with a thinner blade.

Dado stacks require a dedicated dado brake cartridge. This means that when changing between a 10″ blade and a dado stack, you also have to change brake cartridges. It is simple to do, but I have put off getting a dado stack because I’m hung up on the time it must add to blade changes.

The space between the brake and the blade must be between 1/16 and 1/8. If the space is too great the blade will take longer to stop in the case of brake activation. So I imagine that each time you change to a dado set this adjustment must be made (10″ to 8″ = a two inch adjustment).  A correction: the dado brake  cartridge makes up the 2″ difference, so the space between the dado stack and the dado brake will probably not need adjustments *forehead slap* . The adjustment tool has a home on the side of the saw, and there is a spacing tool to make it easy to adjust the gap.  Manually spin the blade by hand before turning the saw on to check that it is not touching the brake. If the blade is too close to the brake and they touch it will trigger the brake.

Dado sets must be 8″. Buying a 6″ dado set is not an option.  Again the brake would be too far from the blade.

Fit, finish… and the overall grade

I have found that the cut quality is very good on this saw. The motor is powerful enough for my needs so far. I find that the overall quality of the saw is excellent, the parts are solid and move smoothly and adjusting them is simple. I even found a user manual to print out for my mobile base very quickly on the saw stop website. I’ve bought products before where finding a user’s manual can be a nightmare. Instructions in the manuals are well illustrated and explained. The easy access to all of my accessories is a treat, and there are many minute details that factor in a woodworker’s needs, not just a woodworker’s safety. But sometimes both. One such example: there are two wrenches for changing the blade, each is bent  away from the blade to give your knuckles plenty of space while turning so that you don’t catch yourself on the blade. Overall grade A-, I’m quite happy with the saw, and have not regretted purchasing it.

The Guard
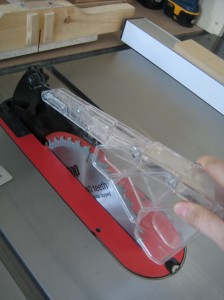
Easy to use, and it doesn't get in the way.

I really like the blade guard, it installs without a tool, a simple lever is used to lock it in and release it. The clear plastic  is removable and you can lock that in the down position by fitting it into some notches.  I keep it on for making most rips, except those lesser than 1  1/4″ wide. I made a thin push stick, but even this guard can’t allow you the space to rip really thin pieces. To Saw Stop’s credit they include plans in the back of their manual to build an auxiliary fence and push block for cutting thin strips- in order to keep the guard in use. There are also some plans for a push stick and feather board.
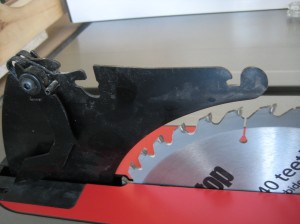
These are the notches that the clear plastic guard clips into with a spring mechanism.

The clear guard has three little flaps on either side that conform to the wood as it passes by the blade. I really appreciate this feature when I’m cutting 3″ thick stock because each flap comes back down independently of each other and covers the blade quicker than some other blade guards I’ve seen that are one large piece.
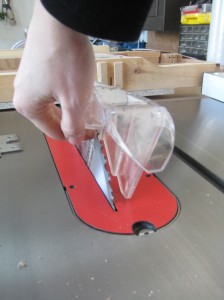
Here I'm demonstrating how the flaps move aside only where the wood contacts them, sometimes only lifting the guard on one side.

If the splitter weren’t enough, there are pawls to keep the wood from kicking back. I always keep them down when making cuts.
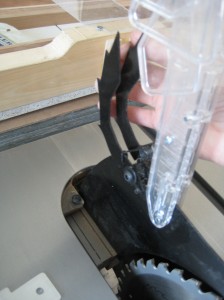
The pawls tend to get in the way when installing the throat plate, so I lift them up.

The riving knife

The riving knife is designed well, it tapers to it’ s final thickness, so that whether you have a thin kerf blade or a standard 1/8″ kerf blade, the wood will pass smoothly by the knife. When I was in school I learnt very quickly how annoying a poorly made riving knife could be- I once got stuck half way through a cut because the riving knife was thicker than the blade.
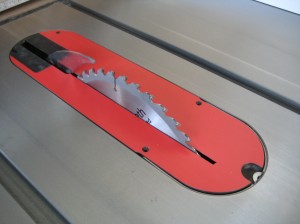
The riving knife is what I use during most cross cuts, I never use the saw without at least the riving knife in place.
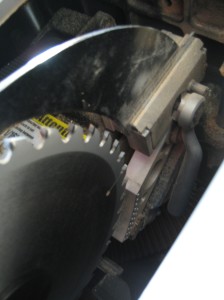
Swapping the riving knife out for the blade guard is super easy with the toolless lever.

The throat plate

I find the throat plate finicky to put in place quickly. I’m used to home made throat plates that don’t require much more than dropping it into place. I haven’t gotten used to it yet. I love the set screws easily accessible from the TOP of the insert, saving lots of time when adjusting it flush with the table top.
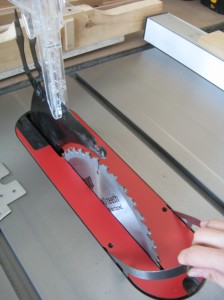
It has a handle! I often don't quite get it registered in the back and the plate skews because it is split most of the way down the plate. One half of the back will lie flush and the other will get hung up on a screw and be 1/4" above the table. Then I start again.

I’m not sure how home made inserts will stand up to having a slit all the way up them, but I imagine if they are made out of a similar material (some kind of composite plastic) the inserts should do fine.

The fence

I have a 30″ premium fence. It’s the bottom of the line for Saw Stop 1.75hp saw and it’s actually not too bad at all. I wouldn’t mind having something heftier, but otherwise I enjoy the smoothness of it’s glide, it’s adjustable in all the ways you need, and it does the job.  I haven’t found it lacking. On an aesthetic level the silicone handle tends to get really dirty.
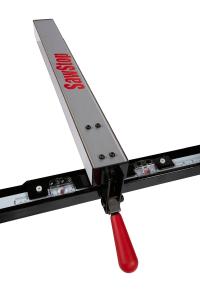
The cross-hairs are adjustable.

The miter guage

I like that the miter gauge has two slots for screws instead of two holes where you would attach a sacrificial fence. This saves a lot of time.

I leave screws and washers in the sacrificial fence and attach and detach it from the mitre gauge as needed with a turn or two of the screw driver.

I don’t like using the miter gauge very much though, sometimes the weight of the fence I attach to it is enough to tilt the fence as I push it into the blade and the sacrificial fence will sometimes end up bumping to a stop on the edge of the table. It’s not fun to then begin lifting the gauge as your work piece is half way through the blade.

Dust collection

I have not upgraded to having a dust collection at the blade guard, this would solve a lot of the dust coming out at the operator. I also don’t have a super powerful dust collector, so that may also play a part. One really nice feature about the saw stop is that it has a shroud underneath the blade so that most of the dust that drops below the table falls directly into a dust collection hose. No more giant heap of dust to sift through if/when you drop the nut when changing blades.

I have just barely coated the inside of my table saw with dust. Most of the dust gets neatly sucked away BEFORE it can pile up in the table saw base.

The brake cartridge
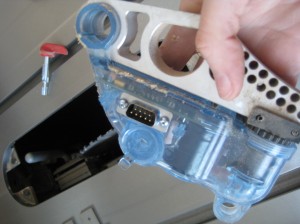
When I do get a dado stack, it isn't that hard to swap out the brake cartridges. You simply turn a red lever, pull out the pin, then pull out the cartridge.

It doesn’t take that much time to remove the brake cartridge, but at the same time I haven’t done it many times.  It seems awkward to get a hand that deep into the gullet of your saw (half way below the blade). Also I feel terrified of damaging the cartridge. The manual does say to be careful not to hit it.


The mobile base…
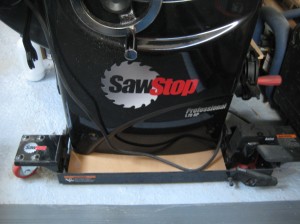
The base that came with my saw lets me roll the saw away from the wall if I need to with just the push of a foot it's up on it's wheels.

A place for everything…
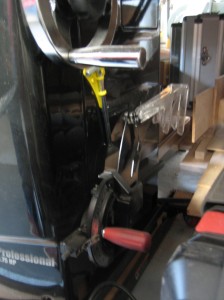
I'm glad to have this storage caddy, it makes my life simpler to have a compact place to put away each accessory and tool that belongs to the saw stop. On the other side of the table saw base there is a hook for the two blade changing wrenches, and a push stick that came with the saw.

Thanks for reading my review! Happy woodworking.


A review of the Rockler Dust Right quick release hose and fittings…

7 Mar

I’ve had the Rockler Dust Right hose and fittings attached to my dust collector for several months now. Here is my experience so far with the product.

The need…

Space in my shop is tight at 8’x16′. As I was setting up my shop my eyes kept wandering over to a pile of hose and fittings I’d gotten with my used dust collector.

The pile in question.

I knew I’d have to get around to it soon. The problem was, when I laid out all the lengths of hose in the backyard, I realized there wasn’t nearly enough to run to all of my chip producing machines. I also realized the hose would have to run along the walls and ceiling eating up space. I started to calculate the cost of how much more hose, fittings and time and effort I’d be putting into setting up my dust collection system. I didn’t like the answer. I thought there must be another way…

The solution…

I did some online searching, and perused the tool catalogs I had on hand. This is when I found out about the Dust Right quick release hose and fittings.

This is the hose in it's compressed state, and hooked up to a second hose that runs under my bench and leads to my table saw.

The hose expands, contracts and bends easily. The quick release fittings allow you to switch the hose between any given number of machines quickly and easily provided they have the mating Dust Right fittings in place. This seemed like the perfect solution for a small shop like mine.

The alternative…

In researching this product I did hit my local woodworking supply stores to see if there was an alternative. I did find that stores sell a type of expandable hose by the foot, and there seemed to be some quick release fittings available as well. But the quality and ease of use were a far cry from the Dust Right equivalents judging from Rockler’s  promotional video. I also calculated that the price would be comparable, so why not go for the rockler set.

Setting up the system…

I ended up buying the 3′ hose that extends to 21′ since I’d read in reviews that the 14′ hose seemed too short for most people’s needs. I bought the handle, and 4 dust port fittings for my main machines. Each was on sale, all the better. The kit also came with several keyed hose clamps.I found setting up the system was a breeze. I was so pleased that I sold the old pile of hose and fittings for $40 and have no regrets.

Here are the clamps that come in the kit.

Ease of use…

For the most part the Dust Right system has performed as described by Rockler. I’m very happy with how quick and easy it is to switch from machine to machine. The quick release is the main feature for me. I love it. The extendable hose is also super bendy and therefore is easy to maneuver around the shop.

Here is the quick connect / release in action...

Slides on with a friction fit. Picture a regular machine port instead of the blast gate I have pictured here.

However, I have yet to set up a wall mount docking system for my hose, so when I go to store it I feel like I’m playing with a 21′ slinky. But I plan to remedy this soon, and I don’t find it too much of a nuisance at that. It stores in seconds.

It ain't pretty, but for now this is my way of storing the hose when not in use.

Here are some situations where the system works like a champ:

From the dust collector...

... to the jointer! If I need more foot space I move the hose over a bit. That doesn't seem to be an issue.

Or to the planer!

Again, the hose is nicely out of my foot path. It contours around my work bench neatly.

And to the band saw- by the way in this instance I took a regular 4" fitting and wound masking tape around the fitting until it was built up enough that the dust right handle fit snuggly.

And for the table saw...I connected a regular hose to my table saw since the port was not easily accessible (under my bench)...

It comes out the other end under my bench where I can easily hook up to it .

And here is the dust right hose in place.

The one problem I’ve found with the dust right system…

In the case of my router table hookup, the system doesn’t stay put. I think because I have two reducers involved.

Because I have more than one reducer involved, and they extend past the router table, the fittings don't have much support...

The hose reaches, and the fittings support the weight of the hose until...

Let's see what happens when I turn on my dust collector...

Crash! Because the dust right reducer has a rubber connection leading to the 4" fitting, the weight of the hose, plus the suction of the dust collector cause the rubber part to bend until the two separate- causing a crash.

If there was a more solid connection between the two components of this fitting I think I wouldn't have this problem.

The other issue…

I’ve also found that even though I went with a hose that is 5′ longer than my shop, it’s hard to extend it to the very full length of my shop. Like when my dust collector is on one extreme and I have a machine up against the wall on the other extreme, to pull the hose to the opposite wall of my shop is just possible, but then to hook it up around behind the machine against that wall is pretty much going to lead to another crash.

Yea or nay…

Yea! Everything considered, I’m still absolutely happy with my purchase because of the world of good it’s done for my shop. I appreciate the system every time I use it. I don’t mind working around a few small issues. I’d advise adding about 10′ to the length of your shop then purchasing the length of hose that fits that measurement. Unless you don’t need to reach the extremities of your shop, or you have a limited space to store your hose in the compressed state, you might want to order a shorter hose.

And just to not leave you hanging…

I set up my shop vac for the router table, and mitre saw, in lieu of the dust right system. The shop vac does a wonderful job, so I’m not going to fix what’s not broken.

Thankfully my shop vac lives on the same side of the shop as my router table and mitre saw, and does a great job.

Next I’m going to post a tip on adapting your tape measure, explain my newest tool purchases, and a write few words on my return to the workforce after three months off.

Blog hiatus is over

22 Feb

It’s been a busy while since I last posted. But a lot has happened and I’m going to post about my woodworking progress (and process) again.

If you’re just tuning in: I started woodworking not long ago. I took a 14 month course and graduated almost exactly a year ago today. This blog follows me as I begin my career in woodworking. My ultimate goal is to become a self employed woodworker.

A brief recap of my woodworking career over the last year:

  • I had an apprenticeship last winter that lasted 6 weeks. I enjoyed learning in an environment that had completely different methods of operation than I’d experienced at woodworking school.
  • I lined up a woodworking job about a week after my apprenticeship and worked for a studio that specialized in high end corporate gifts such as vases, bracelets and desktop organizers. I stayed on for six months.
  • I then lined up a new job to diversify my experience and skill sets and worked in the aerospace industry building cabinetry for private jets.
  • Now I’m looking for a new job again and also spending time in my own shop making furniture

A brief recap of my personal shop activities over the last year procuring a space, furnishing it with tools and working wood! :

Winter 2011

  • I made arrangements with my family to use a 16’x8′ outbuilding on my family’s property. It’s heated, and wired for 110.
 Spring
  • I took inventory of the tools I had available to me through family connections. Mainly hand tools, a few portable power tools, a drill press, and a bandsaw.
  • I also  planned which tools I might need to purchase next and which ones would run on 110.
Summer
  • July was the month that I took possession of the outbuilding on my family’s property
  • A LOT of time was dedicated to cleaning out and preparing my new shop space
  • I put up peg board, fashioned a work bench out of an old collapsible table and some fence 4x4s, and dismantled some giant shelves that took up too much floor space.
  • My first major purchase was a table saw-  a 1.75hp professional cabinet SawStop saw. It was a demo model so I got $1000 off the ticket price. I paid for it in installments and had it delivered by mid summer.

If the blade touches skin a brake is activated and the blade drops down under the table.

  • I soon realized that my shop space was very humid and so I picked up a dehumidifier for $50 at a flea market, and some wax for my cast iron surfaces, and finally a magnetic cover for my table saw
  • I also needed a dust collection system so I found a small portable model for $100 second hand. I sold the hose and fittings that came with it for $40 and bought a rockler extendable dustright hose and attachments to easily hook up to any machine. I didn’t have the space to run hoses along the walls and or ceiling.
Autumn
  • Late summer and early autumn saw me painting the shop floor and re-roofing the shop to seal out the moisture of the impending winter.
  • Autumn was when I made some serious plans to start my shop up. In my mind it came down to not having all the necessary equipment for that to happen. I made a series of purchases. A cheap drill $50 brand new. A second hand 6″ jointer for $125. A brand new lunch box planer with helical cutters $890. I also got a cheaply made but fully equipped router table from a local home improvement center for $120.
  • With birthday money I bought a bench vise which was an adventure to install, and a kit of 4 bessey parallel clamps. $200 for everything.
  • Leading up to Christmas I finally had (in my opinion) amassed enough equipment to tackle a project that would effectively christen my shop. I decided on building a set of toy trucks for my nephew. I didn’t have a drop of glue so bought my first 4liter bottle. The gift went over well!
Winter 2012
  • While building my first project I saw many areas that needed improving around the shop for my work to be accurate, predictable and repeatable. I adjusted my table saw fence correctly (second time’s a charm). I built a collapsible infeed table  and a crosscut sled for my table saw. I built a fence for my bandsaw, and I built a rolling base for my planer. I also got a set of drum  sander bits for the drill press, a quick change drill/counter sink and driver kit,  and hallelujah I finally bought sandpaper. I’m finally free to throw out sandpaper AS SOON as it doesn’t cut efficiently.
  • I replaced an old mitre saw that didn’t have a guard with a basic dewalt mitre saw and it’s 10 times better, the fence, the guard, and the cut quality. I bought it used for $100 and it came with an 80 tooth fine crosscut freud blade. I also caved into a sale and bought new porter cable drill for $50 because the drill I had needed 24HOURS to charge! Check the fine print when buying!
  • Now I’m out in the shop building a series of tables, I’ve just started but I’ve already made a jig and my table tops are done.
  • I’m making the tables out of wood I pulled out of the scrap bin at school (a year ago!) so I’m trying to use what I have on hand. In so doing I’ve paired each top with possible blanks for legs and stretchers and popped the measurements of the pieces I have into Google Sketch up. Spent some time on the designs and now I’m ready to go back to the shop to build them!

I’ll be posting regularly again, and I’ll be posting about any and everything that comes up. The journey continues! I promise a shop tour soon!

Table saw…check!

15 May

In previous ruminations and blog posts I’d decided to start using whatever tools I have to start woodworking. My opinion on the matter has changed, for many reasons. For one my shop space has been tied up for longer than I expected, not allowing me to just START with said tools. Both spaces I was considering for my shop are now filled with storage. Second was that I received a sizable tax refund. Another reason was that I took a close look at the old table saw available to me- it didn’t have a powerful enough motor (1/2 HP) and had a terrible fence that would need replacing, it also lacked guards, and a safety switch. I looked into replacing the fence and decided it would be more cost effective to just get a used table saw with better features altogether.

This started the hunt for a table saw. The used table saw market here in spring is killer. I did not fair well. I found great deals, and they would all elude me. Someone always got there first. I had my heart literally broken over “the one that got away”. I called to inquire and it was gone. I ended my search abruptly after going out to see what turned out to be a dud-of- all-duds table saw. The man selling the saw lied to me,  the saw was rusty, there were missing parts, and there were words carved  into the cast iron top! Immediately after this disheartening field trip, in a moment of weakness or maybe a moment of genius- I’m still not decided- I headed over to a familiar retail store  to moon over my dream saw. I’d visited about a month before when there’d been a tool show at the store and it had been love at first sight. It didn’t take more than half an hour and a little prodding from a family member and a sales rep and I’d bought the thing.

And so ends and begins the tale of how I bought my SawStop. It’s a 1.75HP professional cabinet saw, comes with the rolling base, and is pre-wired for 110v which is what my shop is wired for.

If the blade touches skin a brake is activated and the blade drops down under the table.

I’m STILL as giddy as a kid about it- no regrets thus far. It will be paid off and delivered at exactly the same time as when my shop space will be freed up- I’m delighted.  The SawStop’s finger saving technology of course was a huge plus, I will be just as careful using it as a normal table saw though. I’m also glad to report that the fit and finish are also top quality on the SawStop. I seriously can’t wait to start using it!

My tool buying spree won’t end there. I’ve decided that I NEED to have a planer and jointer and some form of dust collection. I’m going to be tracking down a jointer and planer next. Each still have the 110v limitation as I’m not rewiring the shop. There is also a space limitation in my future 8’x16′ shop. I’m considering a lunchbox planer with helical cutters to reduce noise and improve cut quality. I’m also considering  6″ jointers exclusively with small footprints and hopefully also helical cutters to reduce sound. As for dust collection, I may start a bit primitive, with a shop vac and a filter attached to a square fan(you know that old trick!). I’ll keep you posted on new developments.

Developments on the shop front…

12 Mar

A “family meeting”  about the family  shop space that I want to set up shop in has changed my plans for the space significantly.

Meeting consensus:

The bad news

We’ve decided it’s not a good idea to part with any of the stuff IN the space. Since the shop space is the only place to store it all, there will not be much space to work with after all.

The good news

There is a secondary building 8’x 16′ next to the shop that has working electricity that I can use weekends- after August(once it’s cleared of storage)

I can still use a portion of the original shop space. In fact it will come in very handy during the period between now and August, when the secondary building frees up.

Plan changes blow-by-blow

BEFORE I was planning to get a job in industry to raise funds for all of my shop plans, and start woodworking on weekends

NOW Nothing has changed except my shop space will be smaller, so will need smaller machines

BEFORE I was planning to set up the shop slowly and build it up over time, as a permanent shop space

NOW I am going to use the space  as a temporary fix, and only on weekends

BEFORE I was planning to get the water damaged electrical in the shop looked at, and  rig it to have sufficient voltage and outlets

NOW I plan to just use the secondary building that is wired and heated for light duty shop tools and run extension cords into the shop for jobs that require more space (cutting sheet stock)

In light of all the plan changes, I’m actually quite okay with all of it, this will still be quite advantageous for me. I’ll have use of all the machines I listed in a previous post, plus the space for free during the time it takes to build funds and plan for the start of my business.

There definitely is a lesson to be learnt from these plan changes though. For those who also are looking for a shop space arrangement that works for them, it’s important to do your homework. It’s also important to roll with the punches, if things don’t go according to plan, don’t abandon your goals, instead adjust as best you can. Also keep back up plans. (for example, as a back up plan, I would rent shop time at a co-op in the city or join a shop that shares rent and tools)

Next course of action:

I’m going to start cleaning the shop as soon as I can ( August)  and purchase a bench-top planer and jointer. I can’t wait to start!