Archive | workshop RSS feed for this section

Home is where the heart is

8 Feb

This winter hasn’t been the best for visiting my shop. I’ve been tired, a little blue, and distracted by work, car troubles, and family obligations. I’ve been longing for my shop to be CLOSER. A thirty minute drive can be a huge deterrent to just popping in and tinkering on this project and that. Add to that the fact that winter makes me want to hibernate, and I’m left with very few shop visits. I hope to move into a house in the next couple of years, and one of my priorities will be to have a shop space attached. It’s a very exciting thought- to be just steps away from resuming a project. Ideally I’d like to find a basement workshop or even a garage, either would probably be just as large as the shop I currently have. I have a real estate listing or two on the fridge that I consider dream options- but I’m willing to compromise!

All this to say that I visited my shop for a second or two while visiting my mom yesterday, and I miss it! I went in on the pretense of checking for leaks etc., but I really just wanted to be in the shop. I suddenly realized that part of the reason I’ve been feeling a little blue of late is that I haven’t had shop time. It didn’t occur to me because I basically woodwork all day at my job- so how could I be missing woodworking? The answer is simple, work is not the same as time in my shop, doing what I want, how I want. I really want those two things to mesh into one eventually. But for now I have to recognize that I haven’t been fulfilling a need. So starting this weekend I will head back to the shop and kick up some sawdust.

Here are a few pictures of a little reorganization I did over the holidays.

Before shot:

IMG_20121215_155339

When I suddenly added this sander to the shop I had to think quick and come up with a stand for it to sit on. I happened to have a workmate lying around so I used it for this end, but as you can see it was a clunky affair, not really a permanent solution.

After pic of sander:

While this stand may also just be temporary, I find it much more easy to tolerate as it has opened up loads of space that I frankly wasn’t functioning well without!

Before pics of fastener storage:

A flurry of cutting my parts to dimension was the beginning of the project. Then followed a lot of edge banding.

Top left you can see my previous fastener storage system on the end of my bench.

It's a bit cleaner than this now. There's a dust collector in the background. I haven't found a window treatment for the door window yet...

In this photo you can just barely see the back right corner held blue bins along the wall for fasteners. It worked for a while but eventually the racks failed and the bins would drop off the wall spilling their contents all over the floor.

After pic of fastener storage:

This storage solution, which incorporates my paper dispenser for protecting my work-surfaces during glue ups, has me wondering why I didn’t think of it sooner! Ah what a difference!!

Yesterday I noted how much this reorganization session had changed my space for the better. My previous setup had created a lot of frustration from tripping over the workmate, and from searching for dropped/ spilled items on the floor. I’m certain that the current state of the shop will improve how productive I am in the shop.

As an aside, I recently had to suffer through a bout of  second hand car shopping, as my car (that I recently posted about!) needed replacing much sooner than anticipated. I had been wanting to change up from a sedan for quite a while as I found it was a rather formidable limitation to woodworking. I couldn’t pick up machinery, or transport furniture that I’d built with a sedan, although picking up boards of wood was surprisingly possible. Because I wanted to purchase a car outright rather than be tied to payments, I went with a second hand car. And because I wanted more flexibility to transport woodworking related items, I went with a hatchback. And finally because I was worried about day to day fuel consumption I compromised a bit on size. The car I went with has 64 cubic feet of cargo space.

2003 Suzuki Aerio SX

I just thought it was interesting to mention that woodworking can even influence a car purchase! Also I figured out that in a few years when I might need a “real” woodworker’s car, with more cargo space I might want to get a Honda Element- the cargo configurations were made for surfers and mountain bikers, but they also would work perfectly for woodworkers!

Happy woodworking!

Summer time and the livin’ is easy… but hot!

4 Jul

As the full swing of summer has kicked in here, I have become aware of the problem of a sweltering shop. Lucky for me I was out and about and noticed an air conditioner on a curb close to my neighbourhood this weekend. The owner of the air conditioner was  moving house and was eager for me to whisk it away and assured me that it worked perfectly. I love getting free stuff! I cleaned it out thoroughly, tested it and then brought it over to my shop.

This turns out to be the best window to set my air conditioner into- the other two windows are such that I would have to remove all of the panes to fit the air conditioner, leaving a lot of space around it to fill in. Frankly I was too worried about how easy it would be to break into the shop with such a set up.

As it happens this air conditioner must have been fitted into a similar window set up in it’s previous home because there were metal tracks that mated perfectly with the window tracks.

I inserted a filler strip of wood into the space between the mating tracks to keep the air conditioner from from rocking front to back.

I then added filler strips to keep the air conditioner from sliding laterally in the window track. I trapped the wood in the tracks by lifting the window and inserting the wood strips, then bringing the window back down.

And finally I wedged two pieces of wood in the window track to keep the window locked down over the air conditioner so that it won’t budge.

All that was left was to seal the perimeter with duct tape. The closest outlet is a few feet to the left of the door, while this isn’t ideal, I’ve heard that air conditioners are best plugged directly into the wall. So I’d rather not run and extension cord along the more convenient wall to the right of the door. I lift the cord over my head to get in and out, which isn’t often, so I’m willing to deal with a minor inconvenience for a cool shop.

And there it is! Now I won’t see a hot summer’s day as a deterrent to heading over to the shop!

Another reason not to put things off!

26 Jun

Back at my shop…

I’ve been ignoring a glitch in the shop for a couple of weeks. The rolling base for my table saw stopped rolling. As a result I haven’t been able to move my table saw back up against my bench. This made for a large gap that off cuts could fall into.

To my surprise the problem was that one of the casters fell apart. Three wheels were moving while the fourth kept the saw grounded, unable to roll.

A possible reason for the caster failure is this; I have a professional cabinet saw and it came with an industrial mobile base- the two are only compatible if you buy a conversion kit. The store I bought the saw& base from didn’t bother with a conversion kit and simply put down a length of particle board across the straps of the mobile base. This left a good 8″ of sliding room (front to back) for my saw to travel on the particle board as I wheeled it around. It may have slid too far back and put too much pressure on that caster (although the casters are rated for 1000lbs).

I of course ignored the problem because I thought I’d have to shop around for a replacement. Then a few days ago I remembered that I should be calling the manufacturer of the rolling base to get the problem sorted *forehead slap*. I put the call in and the problem was resolved in under ten minutes. I received a replacement caster in the mail the very next day- free of charge.

Changing it went smoothly.

Needless to say I’m a happy customer.

And so now my table saw sits happily butted up against my work bench again.

Keeping in mind the possible cause of the caster failure, I decided to take some precautionary measures.

I tacked down some wood scraps to trap the saw in the center of the particle board. Now at the very least this conversion has made my saw safer, if not my casters more long lived.

Here’s a short video I took showing the condition of the broken caster.

This weekend it is so ON…

8 Jun

The battle begins against the carpenter ants that have established themselves in the walls of my wee shop. I called Orkin (exterminators) to get a quote- just to see if that might be the best solution. After that sticker shock (min $500) I resigned myself to going this battle alone.

Know thy enemy

After some brief but fruitful cramming sessions on the topic I learned that carpenter ants are VERY difficult to get rid of. They can have satellite nests around the main nest, and annoyingly they can have more than one queen. Apparently I should be stalking them in the evening when they are most active to find where the main nest might be. They don’t actually eat wood, but excavate it to create their lair (that’s what I’m calling it). They leave tell tale droppings called frass. They LOVE rotten wood. Get rid of the rotten wood and they move on.

Breaking out the war paint

I have two objectives this weekend:

1)Find the sources of rotten wood that have attracted them to the area and remove it.

2)Find the main nest and treat the area

My ammo of choice…

My shop is on family property and there’s a family dog to consider so I made certain to get a  product that would only harm ants. This product is called Chemfree and the ants are supposed to ingest it- maybe even share it when they get back to the nest. I spread a little of it as a test last weekend, but I doubt it will have an effect until I find the main nest. If I find the nest is out of reach of the family dog then I might use something more aggressive.

Image

Here is a photo of the telltale frass (black droppings) that the carpenter ants leave behind. I noticed I had a problem when I first set up shop. I cleaned the area along the wall only to find the black powder regenerating after each cleaning. The white stuff is the product I’m trying out.

Image

I feel bad about killing off these little guys, but I see no other choice. For now I’m starting with a product that is safe for the family dog- but I might have to resort to something more aggressive later on.

Table saw aligned…

10 May

After much procrastination I finally tackled the issue at hand in my shop. I fixed the alignment of the table saw blade to the cast iron tables.

My table saw was a demo model from a store so I didn’t have the privilege of putting it together. It was fully assembled when I bought it, and fully assembled when it got delivered. Frankly I was daunted by aligning my saw because I wasn’t familiar with how the parts were attached. Also I didn’t have a dial gauge- which most sources say is a must for such a task.

Now my tools need tools?! I want to keep my money- for now, thanks.

Thankfully my table saw’s owner’s manual had an alternative method for checking the alignment of the blade. Instead of using a dial gauge, I could simply use a combo square. So I did. As for being daunted by the unfamiliar- in principal it was simpler than I’d thought- as is the case most times that I’m dreading tackling the unknown.

I also found an excellent article on the topic of table saw tune ups that can be found here. What I love about this particular article is that it uses low-tech methods and tools to check alignment.

I used this method from the article…

Block of wood with screw in one end, clamped to miter gauge. Just as accurate as…

And this method from my owners manual- that way I was doubly certain of my alignment!

Combo square registering off of a miter slot. I marked one tooth of the blade with a sharpie. And checked it at both the front and back of the throat plate.

It turned out my blade was about 1/32″ off from the front to the back! No wonder I’d been having such a tough time.

I then began the process of loosening the nuts and adjusting the alignment.

On my saw I had two nuts up front that were easy to access.

Far left.

Far right- well that was fast. Almost there!

But then in the back I had to open an access panel to get at the right rear nut. The left rear nut was even more difficult,  I had to open the motor door AND tilt the saw blade 30 degrees! I thought this would be the fastest part of the process but it took up a good chunk of time. I had to roll the saw out from it’s home to get access to the right rear panel, and get down on the floor with a flashlight to spot the elusive rear nuts. They also happened to be over tightened, and I couldn’t get good leverage from my cramped positions- ugh!

Inside the motor access with the blade tilted 30 degrees- oh THERE’s the darn thing. Far left.

Far right, through an access panel. Wish these had been on the outside perimeter of the saw like the front ones were.

When they were finally loosened, my saw has adjustment screws to finely nudge the table in the desired direction. In the tune up article I mentioned above- it says that for most saws you partially loosen the bolts and tap the table with a  dead blow hammer until it’s aligned, then re-tighten the nuts.

I had to tilt my blade back to 90 degrees to test my progress and then once I had my final setting tilt it back to 30 degrees to tighten the nut .

I also slightly improved the flushitude of my cast iron extensions. But I gave up shortly after landing a solid dead blow to my finger. The nail didn’t turn blue- so I’m good. But ouch. I’ll try not to let my finger get between a dead blow hammer and unforgiving cast iron in the future… looking under the table as I hammered would have helped I think.

I’m psyched. Now that my saw is ready for action I’m keen to move forward with some projects that have been cooling on the back burner.

I’ll post updates on those soon!

Another post on projects from woodworking school will follow in the coming days.

Thanks for reading!

Happy woodworking.

Once upon a Saw Stop… my Saw Stop review

27 Mar

First… the elephant

I have my reasons for choosing Saw Stop. I respect other’s reasons for not buying Saw Stop, and  I certainly respect those who don’t want governments to dictate whether their saw will have  saw stop technology.

I know how to avoid accidents on table saws, I’ve learnt all of the safe procedures. But the fact remains that table saws scare me. And I know that I am human, and human error is  a real thing. I don’t expect that having air bags in a car guarentees that you will not be seriously injured in a crash, but that they will improve the odds that you will be less badly injured than without. I imagine the Saw Stop is similar, I don’t really expect I’d be lightly grazed if I had a severe kickback and my hand went into the blade, but I hope my injury would be less severe than without the technology. In this respect I understand why goverments would want to interfere, it saves them money in the bigger scheme of things if people are less badly injured on table saws. It’s business for them. But for us woodworkers, it’s personal. We each have our own way of doing things. Ask a woodworker how they would go about something and you’ll likely get a different answer from each. From the tool, to the procedure, it’s all personal.

My Saw Stop 

Okay so now that the elephant in the room has been addressed ( I come in peace)  it’s time to get down to the review!


This is the model I purchased.
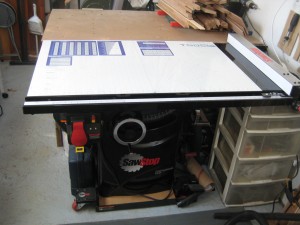
It's a 10" Professional Cabinet Saw 1.75hp 110v

It came with an industrial mobile base, and a 30″ premium fence. A blade guard came standard, as did a separate riving knife/ splitter.


Before buying… key points about the Saw Stop

I did research before purchasing, I’d read up on Saw Stop months before finally giving in. I still didn’t realize several details about the saw until I actually had it in my shop though. So here are some of those details.

You CAN cut wet wood and/or aluminum. On bypass mode. It’s simple to do once you memorize how to initiate bypass mode. I cut particle board that had been sitting in snow and I sliced right through wet patches. Bypass mode is deactivated as soon as you turn off the blade after your cut(s). The saw automatically returns to sensing flesh/metal/wet wood. After cutting conductive materials in bypass mode, you must check the blade for remnants of the conductive material. 

You can test materials to see if they are conductive. The system continues to monitor for flesh and other conductive materials in bypass mode. This means you can take test cuts of a dubious material in bypass mode, and if the red light flashes during the cut you will know that the brake would have activated if you had cut this conductive material in normal mode. If the red light doesn’t come on you know you can cut the material without triggering the brake.

You CAN cut green wood with the safety system activated. Saw Stop claims most wet or green woods can be cut without triggering the brake. And in fact the system is supposed to shut itself off  without use of the brake and display an overload code when the wood is too wet/green. BUT do the conductivity test first to make certain. And there is a warning that cutting really wet woods could interfere with detecting flesh.

The saw does a system check when you first power it on and the blade will not start if the system check reveals ANY errors (such as a brake cartridge installed incorrectly). The system is constantly checking itself also. This means rest assured the saw is detecting flesh and all systems are go when the blade  starts. The one exception being bypass mode.

The blade senses flesh even  in standby mode, when the blade is not on. The blade will not start until you remove your hand or any metal object from contacting the blade. I  found this out because I was squaring my blade with a metal square, and I noticed a red light started blinking whenever I touched the blade, and it would blink a beat or two after I’d removed the square from the blade. The blade wouldn’t start until the red blinking ceased.

Do not buy blades that have rust coatings on the teeth. Coatings such as lacquer on the teeth of the blade could prevent the saw stop system from detecting your flesh, or could slow the reaction time. I called customer service and they clarified that it is only the teeth that matter here, blades such as Freud’s that have the red coating on the body of the blade are okay.

The blades you buy must be at least 3/32 wide. This doesn’t prevent you from buying thin kerf blades, as a matter of fact I just bought one, but I made sure that it was 3/32 wide before buying. The force of the brake when it impacts the blade could cause problems with a thinner blade.

Dado stacks require a dedicated dado brake cartridge. This means that when changing between a 10″ blade and a dado stack, you also have to change brake cartridges. It is simple to do, but I have put off getting a dado stack because I’m hung up on the time it must add to blade changes.

The space between the brake and the blade must be between 1/16 and 1/8. If the space is too great the blade will take longer to stop in the case of brake activation. So I imagine that each time you change to a dado set this adjustment must be made (10″ to 8″ = a two inch adjustment).  A correction: the dado brake  cartridge makes up the 2″ difference, so the space between the dado stack and the dado brake will probably not need adjustments *forehead slap* . The adjustment tool has a home on the side of the saw, and there is a spacing tool to make it easy to adjust the gap.  Manually spin the blade by hand before turning the saw on to check that it is not touching the brake. If the blade is too close to the brake and they touch it will trigger the brake.

Dado sets must be 8″. Buying a 6″ dado set is not an option.  Again the brake would be too far from the blade.

Fit, finish… and the overall grade

I have found that the cut quality is very good on this saw. The motor is powerful enough for my needs so far. I find that the overall quality of the saw is excellent, the parts are solid and move smoothly and adjusting them is simple. I even found a user manual to print out for my mobile base very quickly on the saw stop website. I’ve bought products before where finding a user’s manual can be a nightmare. Instructions in the manuals are well illustrated and explained. The easy access to all of my accessories is a treat, and there are many minute details that factor in a woodworker’s needs, not just a woodworker’s safety. But sometimes both. One such example: there are two wrenches for changing the blade, each is bent  away from the blade to give your knuckles plenty of space while turning so that you don’t catch yourself on the blade. Overall grade A-, I’m quite happy with the saw, and have not regretted purchasing it.

The Guard
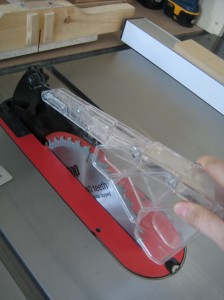
Easy to use, and it doesn't get in the way.

I really like the blade guard, it installs without a tool, a simple lever is used to lock it in and release it. The clear plastic  is removable and you can lock that in the down position by fitting it into some notches.  I keep it on for making most rips, except those lesser than 1  1/4″ wide. I made a thin push stick, but even this guard can’t allow you the space to rip really thin pieces. To Saw Stop’s credit they include plans in the back of their manual to build an auxiliary fence and push block for cutting thin strips- in order to keep the guard in use. There are also some plans for a push stick and feather board.
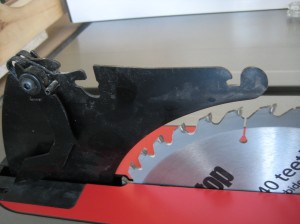
These are the notches that the clear plastic guard clips into with a spring mechanism.

The clear guard has three little flaps on either side that conform to the wood as it passes by the blade. I really appreciate this feature when I’m cutting 3″ thick stock because each flap comes back down independently of each other and covers the blade quicker than some other blade guards I’ve seen that are one large piece.
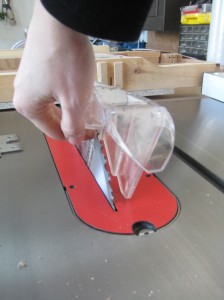
Here I'm demonstrating how the flaps move aside only where the wood contacts them, sometimes only lifting the guard on one side.

If the splitter weren’t enough, there are pawls to keep the wood from kicking back. I always keep them down when making cuts.
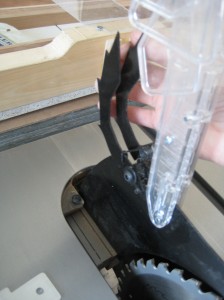
The pawls tend to get in the way when installing the throat plate, so I lift them up.

The riving knife

The riving knife is designed well, it tapers to it’ s final thickness, so that whether you have a thin kerf blade or a standard 1/8″ kerf blade, the wood will pass smoothly by the knife. When I was in school I learnt very quickly how annoying a poorly made riving knife could be- I once got stuck half way through a cut because the riving knife was thicker than the blade.
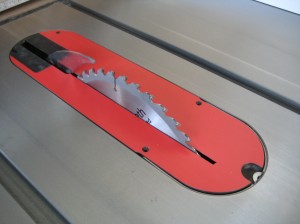
The riving knife is what I use during most cross cuts, I never use the saw without at least the riving knife in place.
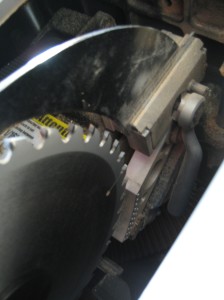
Swapping the riving knife out for the blade guard is super easy with the toolless lever.

The throat plate

I find the throat plate finicky to put in place quickly. I’m used to home made throat plates that don’t require much more than dropping it into place. I haven’t gotten used to it yet. I love the set screws easily accessible from the TOP of the insert, saving lots of time when adjusting it flush with the table top.
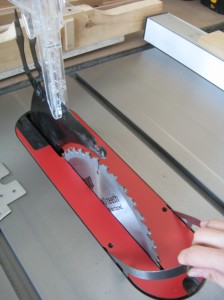
It has a handle! I often don't quite get it registered in the back and the plate skews because it is split most of the way down the plate. One half of the back will lie flush and the other will get hung up on a screw and be 1/4" above the table. Then I start again.

I’m not sure how home made inserts will stand up to having a slit all the way up them, but I imagine if they are made out of a similar material (some kind of composite plastic) the inserts should do fine.

The fence

I have a 30″ premium fence. It’s the bottom of the line for Saw Stop 1.75hp saw and it’s actually not too bad at all. I wouldn’t mind having something heftier, but otherwise I enjoy the smoothness of it’s glide, it’s adjustable in all the ways you need, and it does the job.  I haven’t found it lacking. On an aesthetic level the silicone handle tends to get really dirty.
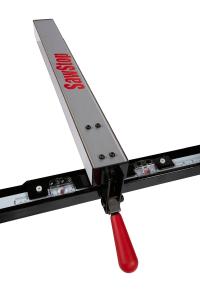
The cross-hairs are adjustable.

The miter guage

I like that the miter gauge has two slots for screws instead of two holes where you would attach a sacrificial fence. This saves a lot of time.

I leave screws and washers in the sacrificial fence and attach and detach it from the mitre gauge as needed with a turn or two of the screw driver.

I don’t like using the miter gauge very much though, sometimes the weight of the fence I attach to it is enough to tilt the fence as I push it into the blade and the sacrificial fence will sometimes end up bumping to a stop on the edge of the table. It’s not fun to then begin lifting the gauge as your work piece is half way through the blade.

Dust collection

I have not upgraded to having a dust collection at the blade guard, this would solve a lot of the dust coming out at the operator. I also don’t have a super powerful dust collector, so that may also play a part. One really nice feature about the saw stop is that it has a shroud underneath the blade so that most of the dust that drops below the table falls directly into a dust collection hose. No more giant heap of dust to sift through if/when you drop the nut when changing blades.

I have just barely coated the inside of my table saw with dust. Most of the dust gets neatly sucked away BEFORE it can pile up in the table saw base.

The brake cartridge
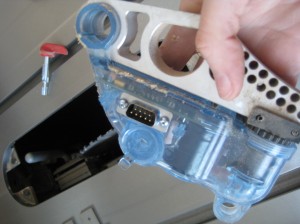
When I do get a dado stack, it isn't that hard to swap out the brake cartridges. You simply turn a red lever, pull out the pin, then pull out the cartridge.

It doesn’t take that much time to remove the brake cartridge, but at the same time I haven’t done it many times.  It seems awkward to get a hand that deep into the gullet of your saw (half way below the blade). Also I feel terrified of damaging the cartridge. The manual does say to be careful not to hit it.


The mobile base…
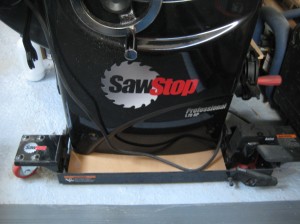
The base that came with my saw lets me roll the saw away from the wall if I need to with just the push of a foot it's up on it's wheels.

A place for everything…
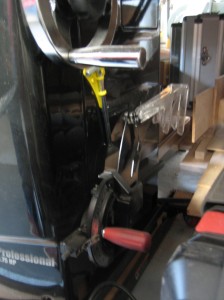
I'm glad to have this storage caddy, it makes my life simpler to have a compact place to put away each accessory and tool that belongs to the saw stop. On the other side of the table saw base there is a hook for the two blade changing wrenches, and a push stick that came with the saw.

Thanks for reading my review! Happy woodworking.


A review of the Rockler Dust Right quick release hose and fittings…

7 Mar

I’ve had the Rockler Dust Right hose and fittings attached to my dust collector for several months now. Here is my experience so far with the product.

The need…

Space in my shop is tight at 8’x16′. As I was setting up my shop my eyes kept wandering over to a pile of hose and fittings I’d gotten with my used dust collector.

The pile in question.

I knew I’d have to get around to it soon. The problem was, when I laid out all the lengths of hose in the backyard, I realized there wasn’t nearly enough to run to all of my chip producing machines. I also realized the hose would have to run along the walls and ceiling eating up space. I started to calculate the cost of how much more hose, fittings and time and effort I’d be putting into setting up my dust collection system. I didn’t like the answer. I thought there must be another way…

The solution…

I did some online searching, and perused the tool catalogs I had on hand. This is when I found out about the Dust Right quick release hose and fittings.

This is the hose in it's compressed state, and hooked up to a second hose that runs under my bench and leads to my table saw.

The hose expands, contracts and bends easily. The quick release fittings allow you to switch the hose between any given number of machines quickly and easily provided they have the mating Dust Right fittings in place. This seemed like the perfect solution for a small shop like mine.

The alternative…

In researching this product I did hit my local woodworking supply stores to see if there was an alternative. I did find that stores sell a type of expandable hose by the foot, and there seemed to be some quick release fittings available as well. But the quality and ease of use were a far cry from the Dust Right equivalents judging from Rockler’s  promotional video. I also calculated that the price would be comparable, so why not go for the rockler set.

Setting up the system…

I ended up buying the 3′ hose that extends to 21′ since I’d read in reviews that the 14′ hose seemed too short for most people’s needs. I bought the handle, and 4 dust port fittings for my main machines. Each was on sale, all the better. The kit also came with several keyed hose clamps.I found setting up the system was a breeze. I was so pleased that I sold the old pile of hose and fittings for $40 and have no regrets.

Here are the clamps that come in the kit.

Ease of use…

For the most part the Dust Right system has performed as described by Rockler. I’m very happy with how quick and easy it is to switch from machine to machine. The quick release is the main feature for me. I love it. The extendable hose is also super bendy and therefore is easy to maneuver around the shop.

Here is the quick connect / release in action...

Slides on with a friction fit. Picture a regular machine port instead of the blast gate I have pictured here.

However, I have yet to set up a wall mount docking system for my hose, so when I go to store it I feel like I’m playing with a 21′ slinky. But I plan to remedy this soon, and I don’t find it too much of a nuisance at that. It stores in seconds.

It ain't pretty, but for now this is my way of storing the hose when not in use.

Here are some situations where the system works like a champ:

From the dust collector...

... to the jointer! If I need more foot space I move the hose over a bit. That doesn't seem to be an issue.

Or to the planer!

Again, the hose is nicely out of my foot path. It contours around my work bench neatly.

And to the band saw- by the way in this instance I took a regular 4" fitting and wound masking tape around the fitting until it was built up enough that the dust right handle fit snuggly.

And for the table saw...I connected a regular hose to my table saw since the port was not easily accessible (under my bench)...

It comes out the other end under my bench where I can easily hook up to it .

And here is the dust right hose in place.

The one problem I’ve found with the dust right system…

In the case of my router table hookup, the system doesn’t stay put. I think because I have two reducers involved.

Because I have more than one reducer involved, and they extend past the router table, the fittings don't have much support...

The hose reaches, and the fittings support the weight of the hose until...

Let's see what happens when I turn on my dust collector...

Crash! Because the dust right reducer has a rubber connection leading to the 4" fitting, the weight of the hose, plus the suction of the dust collector cause the rubber part to bend until the two separate- causing a crash.

If there was a more solid connection between the two components of this fitting I think I wouldn't have this problem.

The other issue…

I’ve also found that even though I went with a hose that is 5′ longer than my shop, it’s hard to extend it to the very full length of my shop. Like when my dust collector is on one extreme and I have a machine up against the wall on the other extreme, to pull the hose to the opposite wall of my shop is just possible, but then to hook it up around behind the machine against that wall is pretty much going to lead to another crash.

Yea or nay…

Yea! Everything considered, I’m still absolutely happy with my purchase because of the world of good it’s done for my shop. I appreciate the system every time I use it. I don’t mind working around a few small issues. I’d advise adding about 10′ to the length of your shop then purchasing the length of hose that fits that measurement. Unless you don’t need to reach the extremities of your shop, or you have a limited space to store your hose in the compressed state, you might want to order a shorter hose.

And just to not leave you hanging…

I set up my shop vac for the router table, and mitre saw, in lieu of the dust right system. The shop vac does a wonderful job, so I’m not going to fix what’s not broken.

Thankfully my shop vac lives on the same side of the shop as my router table and mitre saw, and does a great job.

Next I’m going to post a tip on adapting your tape measure, explain my newest tool purchases, and a write few words on my return to the workforce after three months off.

Wrangling with a band saw blade…

28 Feb

I had an interesting little research session on wrangling band saw blades several weeks ago. I seemed to recall being shown how to fold a band saw blade MANY times and each time I took a mental note of how it’s done. Unfortunately this is the same part of my brain that gets confused about tying knots.  Inevitably I forget each and every time I’m faced with a band saw blade.

tame me.

Even more upsetting was the realization that I didn’t know how to properly UNfold a band saw blade. In school I vaguely remember being shown how to just toss the blade out onto the floor. I did this in my shop and managed to not let go soon enough and then watched with dismay as the blade landed teeth down on my concrete floor. Those band saw blades really take a bite while unfurling! “I can do better” I thought to myself and vowed to finally master the art of band saw blade wrangling.

So I hit my ever-ready source of knowledge-lending– the interwebs. I quickly found the method of folding a band saw blade that worked best for me, the one handed method, which apparently is recommended only for smaller band saw blade diameters. It’s easiest to remember and I avoid getting nicked by the teeth. And then in the same video the biggest revelation– there IS in fact a safe way to unfold a band saw blade. Here is the hands down BEST instructional video clip on band saw blade coiling and uncoiling.

The man in this video is a master, I never tire of watching it. Safe and controlled. Beautiful.

If you want to do it the hard way… follow any number of the other videos I unearthed during my research…

Here’s the ginger one footed twisting method… note how it only gently whips around at the end…

Here’s the “willing it to turn out right” method… don’t miss the uncoiling in the last seconds of the video!

And my FAVOURITE… tossing band saw blades in a field… just me, the field and my band saw blade…

Coming up next I’ll discuss a repetition injury, and later a few words on my employment situation.

Shop furniture and fixtures… my life can be easier!

27 Feb

I recently needed some shop fixtures for the shop. Here is the result. I decided to NOT re-invent the wheel and just peruse the internet for possible plans that would work for each.

I have… a plan

It’s easy to get sucked into fancy looking plans but I focused on finding plans that would be straight forward to build and most importantly be simple to use, while not skimping on adjust-ability. I found an awesomely simple design for a bandsaw fence. And this fence accounts for the drift of the bandsaw blade. Here is a link to the fence on the Wood Magazine website. There’s a wonderfully clear PDF file of the bandsaw fence plan that you can download when you follow the link. I found that I had almost all the materials on hand, some scrap wood, a handle, some aluminum, a lock nut and some bolts. I bought a length of threaded rod for about $4 and by the end of an afternoon had a completed bandsaw fence!

Loosen and tighten the bolts in the fence face to account for drift.

It's a one handed operation to slide it over and lock it down, or remove it altogether. Couldn't be happier.

Onto plan b…

For my crosscut sled I also followed plans from the internet. First I tried following the Wood Whisperer’s video on building a crosscut sled… and darn it if the wood I milled as my fence didn’t bow to heck. I kept getting a false positive on squareness. I lack a proper straight edge at this point and sighting down the board isn’t always super reliable.  In the end I used another board as a fence and another method- since I’d already cut into my sled. I went with a method that requires TWO thicknesses of fence closest to the operator, and only one runner underneath the sled. Click here to see the easy to follow steps on the Fine Woodworking website. I will add that I still had a hard time getting a square cut after setting my fence exactly square to the kerf I’d cut into my sled. The solution was to square my fence to the saw blade itself instead. I’m still boggled by the discrepancy. I suspect my table is not square to my saw blade.

I also added some safety features that I’d seen on other crosscut sleds. Thumb blocks to dummy proof the placement of my hands and a plexiglass guard above the blade.

The final product, complete with safety features. Please tell me I'm not the only one who has had a hard time building one of these!

Ah, who needs a plan…

Another shop fixture I made was something I’d used in the shop where I’d apprenticed. It made life easier and I couldn’t imagine going without an infeed table for the table saw. It’s simply a piece of melamine with a wood strip secured to the underside that fits into the track of your table saw fence, and some legs attached with hardware that lets them fold for storing the table out of the way.

This collapsible infeed table prevents a "balancing act" from happening with long boards or large sheets of plywood etc.

I can also use the infeed table to support my crosscut sled fully, well before I reach the blade.

A few other minor details…

In an effort to avoid a strained back, I decided to make a rolling base for my lunchbox planer. In theory I would roll it out into the small passage I have in the shop and feed stock through, low to the ground, while sitting on a short stool. I wanted to keep the base low so that I could store my planer in such a way that I wouldn’t have to roll it out of the way of the outfeed of my jointer all the time. I tacked some small bits of wood onto the base to prevent the planer from sliding around.

Sturdy and low profile, creating clearance for working at the neighbouring jointer.

In theory it would roll two feet out and i'd feed pieces through.

In reality, my back is feeling better… so I just heft it up on the bench. It’s much easier to read the thickness settings and feed stock. In any event, the base keeps my planer mobile while in storage mode, and well up off the floor which often collects water after rain or winter melt.

I made a quick and dirty job of closing in the base of my router table with scrap masonite and particle board. This way the chips are contained and well away from my baseboard heater.

And finally I made several zero clearance throat plates for my miter saw.

I can attest that it is well worth the time, effort and scrap materials to build any such fixtures for a woodworking shop. I’ve improved safety, accuracy and saved on time. For the time being my most immediate needs are met so I’m content, but I know there will be many more jigs and fixtures to come… storing them all is another matter.

Stay tuned for more shop talk. I’m going to share a brief bit on what I’ve learnt while changing bandsaw blades.

My Shop… the tour!

25 Feb

The jumbled beginnings…

Once I was allowed to take over my future shop space I was SUPER eager to clean it out and fill it up. The timing was unfortunately a bit backwards. I got the space, had enough time to clean out some major shelving units and lots of stuff, and then  immediately afterwards I had the delivery of my table saw. I’d planned to paint the floor before hand- but I was forced to paint it afterwards, in sections. This required moving all the shop contents to one side and then the other, and on my part a lot of sweat and patience. Even more so because I had to coax  away 10 years of  dirt from the concrete with a steel wire broom, some degreaser and THEN treat the floor with concrete conditioner before painting. I had to wait a full day after conditioning and eight hours between coats of floor paint ( I only added  a second coat of paint to high traffic areas). It all happened in the full swing of summer.  Thankfully I had a few old fans to use. Next summer I might consider finding a cheap air conditioner!!

After much cleaning out and some organizing

These shots are after the delivery of my table saw but before painting the floor

You might be able to make out the outline of two massive shelves that were a struggle to remove by myself and stripped screw heads were also a delightful twist

All the stuff needed to be piled out of the way for painting the floor...

I got a lot of exercise this summer!

I wore a gas mask for painting, the fumes were pretty thick in the hot summer air AND it was a tight space.

I couldn't wait to paint over all the rust patches

I was glad that at this stage I hadn't really "installed" anything permanently so everything was easier to move (ie. my bench was still collapsible)

Finally, the floors were sealed!

And then smooth sailing… except….

I had this very optimistic timeline projected onto me by my friends and family members. Surely I’d be set to start woodworking in no time. I had a job to go to and was only fitting in what I could on weekends. I had to arrange the layout satisfactorily and hang up new brackets for wood storage, fix up some kind of bench, and attend to a load of other details that don’t become apparent until you’re facing the need in question. For instance I found it absolutely necessary to track down a sound system. I did so for $20. Then there were other needs piling up, where to sit, how to put up the peg board, where to put this or that, how to make it easier to pull the bandsaw out for use. It went on and on, it felt overwhelming.

Other things weighed heavily on my mind as well. I needed to re-roof  one half of the structure before the first snowfall. I bought shingles, and felt paper and luckily had nails and other supplies.  With the help of my sister who had previous experience with roofing, it was done in one day.

I’ve only found ONE of the “before” shots of the roof and no “after” shots. Oh well. One side of the roof  had shingles that were almost comically corroded. That same side of the roof  now looks immaculate and has proven leak proof thus far.  The building now has a thick layer of snow on top as does the yard.

The before picture! Look at those nasty shingles!

I still have an issue with carpenter ants nibbling away at the framing in the walls. I discovered it around the same time as re-roofing and I tried some house hold product solutions to no avail. I’ll have to call in a professional it seems. Procuring and maintaining a shop space is not always a walk in the park like we’d like it to be!

But after much toil… the moment you’ve been waiting for!

Here are the photos of my shop just a week or two ago.

There's a dust collector in the background. I haven't found a window treatment for the door window yet...

My jointer was made in 1986! There's my planer that I built a base for, but I still lift it up onto the bench.


There's my makeshift bench, bench vise, and dehumidifier.


And here's my precious.


The drill press nook. I have to pull the router table out for use generally.


One of my newest additions.


The bandsaw that is on loan to me, and the fence that I made-- more on that later.


I actually fit quite easily by everything. 8'x16' is tight but so far it's working out.


I hope you enjoyed the tour! Next I’ll be talking about the shop furniture and fixtures that I recently made. More specifically: a cross cut sled, an infeed table for my table saw, a rolling base for my planer and a fence for my bandsaw.