First… the elephant
I have my reasons for choosing Saw Stop. I respect other’s reasons for not buying Saw Stop, and I certainly respect those who don’t want governments to dictate whether their saw will have saw stop technology.
I know how to avoid accidents on table saws, I’ve learnt all of the safe procedures. But the fact remains that table saws scare me. And I know that I am human, and human error is a real thing. I don’t expect that having air bags in a car guarentees that you will not be seriously injured in a crash, but that they will improve the odds that you will be less badly injured than without. I imagine the Saw Stop is similar, I don’t really expect I’d be lightly grazed if I had a severe kickback and my hand went into the blade, but I hope my injury would be less severe than without the technology. In this respect I understand why goverments would want to interfere, it saves them money in the bigger scheme of things if people are less badly injured on table saws. It’s business for them. But for us woodworkers, it’s personal. We each have our own way of doing things. Ask a woodworker how they would go about something and you’ll likely get a different answer from each. From the tool, to the procedure, it’s all personal.
My Saw Stop
Okay so now that the elephant in the room has been addressed ( I come in peace) it’s time to get down to the review!
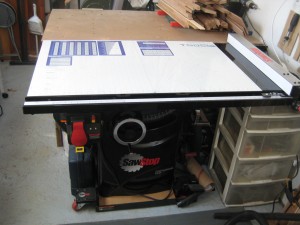
This is the model I purchased.
It came with an industrial mobile base, and a 30″ premium fence. A blade guard came standard, as did a separate riving knife/ splitter.
Before buying… key points about the Saw Stop
I did research before purchasing, I’d read up on Saw Stop months before finally giving in. I still didn’t realize several details about the saw until I actually had it in my shop though. So here are some of those details.
You CAN cut wet wood and/or aluminum. On bypass mode. It’s simple to do once you memorize how to initiate bypass mode. I cut particle board that had been sitting in snow and I sliced right through wet patches. Bypass mode is deactivated as soon as you turn off the blade after your cut(s). The saw automatically returns to sensing flesh/metal/wet wood. After cutting conductive materials in bypass mode, you must check the blade for remnants of the conductive material.
You can test materials to see if they are conductive. The system continues to monitor for flesh and other conductive materials in bypass mode. This means you can take test cuts of a dubious material in bypass mode, and if the red light flashes during the cut you will know that the brake would have activated if you had cut this conductive material in normal mode. If the red light doesn’t come on you know you can cut the material without triggering the brake.
You CAN cut green wood with the safety system activated. Saw Stop claims most wet or green woods can be cut without triggering the brake. And in fact the system is supposed to shut itself off without use of the brake and display an overload code when the wood is too wet/green. BUT do the conductivity test first to make certain. And there is a warning that cutting really wet woods could interfere with detecting flesh.
The saw does a system check when you first power it on and the blade will not start if the system check reveals ANY errors (such as a brake cartridge installed incorrectly). The system is constantly checking itself also. This means rest assured the saw is detecting flesh and all systems are go when the blade starts. The one exception being bypass mode.
The blade senses flesh even in standby mode, when the blade is not on. The blade will not start until you remove your hand or any metal object from contacting the blade. I found this out because I was squaring my blade with a metal square, and I noticed a red light started blinking whenever I touched the blade, and it would blink a beat or two after I’d removed the square from the blade. The blade wouldn’t start until the red blinking ceased.
Do not buy blades that have rust coatings on the teeth. Coatings such as lacquer on the teeth of the blade could prevent the saw stop system from detecting your flesh, or could slow the reaction time. I called customer service and they clarified that it is only the teeth that matter here, blades such as Freud’s that have the red coating on the body of the blade are okay.
The blades you buy must be at least 3/32 wide. This doesn’t prevent you from buying thin kerf blades, as a matter of fact I just bought one, but I made sure that it was 3/32 wide before buying. The force of the brake when it impacts the blade could cause problems with a thinner blade.
Dado stacks require a dedicated dado brake cartridge. This means that when changing between a 10″ blade and a dado stack, you also have to change brake cartridges. It is simple to do, but I have put off getting a dado stack because I’m hung up on the time it must add to blade changes.
The space between the brake and the blade must be between 1/16 and 1/8. If the space is too great the blade will take longer to stop in the case of brake activation. So I imagine that each time you change to a dado set this adjustment must be made (10″ to 8″ = a two inch adjustment). A correction: the dado brake cartridge makes up the 2″ difference, so the space between the dado stack and the dado brake will probably not need adjustments *forehead slap* . The adjustment tool has a home on the side of the saw, and there is a spacing tool to make it easy to adjust the gap. Manually spin the blade by hand before turning the saw on to check that it is not touching the brake. If the blade is too close to the brake and they touch it will trigger the brake.
Dado sets must be 8″. Buying a 6″ dado set is not an option. Again the brake would be too far from the blade.
Fit, finish… and the overall grade
I have found that the cut quality is very good on this saw. The motor is powerful enough for my needs so far. I find that the overall quality of the saw is excellent, the parts are solid and move smoothly and adjusting them is simple. I even found a user manual to print out for my mobile base very quickly on the saw stop website. I’ve bought products before where finding a user’s manual can be a nightmare. Instructions in the manuals are well illustrated and explained. The easy access to all of my accessories is a treat, and there are many minute details that factor in a woodworker’s needs, not just a woodworker’s safety. But sometimes both. One such example: there are two wrenches for changing the blade, each is bent away from the blade to give your knuckles plenty of space while turning so that you don’t catch yourself on the blade. Overall grade A-, I’m quite happy with the saw, and have not regretted purchasing it.
The Guard
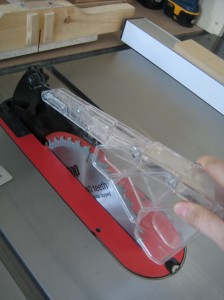
I really like the blade guard, it installs without a tool, a simple lever is used to lock it in and release it. The clear plastic is removable and you can lock that in the down position by fitting it into some notches. I keep it on for making most rips, except those lesser than 1 1/4″ wide. I made a thin push stick, but even this guard can’t allow you the space to rip really thin pieces. To Saw Stop’s credit they include plans in the back of their manual to build an auxiliary fence and push block for cutting thin strips- in order to keep the guard in use. There are also some plans for a push stick and feather board.
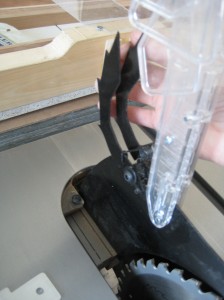
The clear guard has three little flaps on either side that conform to the wood as it passes by the blade. I really appreciate this feature when I’m cutting 3″ thick stock because each flap comes back down independently of each other and covers the blade quicker than some other blade guards I’ve seen that are one large piece.
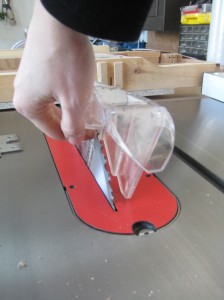
Here I'm demonstrating how the flaps move aside only where the wood contacts them, sometimes only lifting the guard on one side.
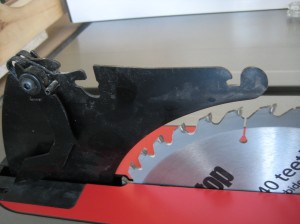
If the splitter weren’t enough, there are pawls to keep the wood from kicking back. I always keep them down when making cuts.
The riving knife
The riving knife is designed well, it tapers to it’ s final thickness, so that whether you have a thin kerf blade or a standard 1/8″ kerf blade, the wood will pass smoothly by the knife. When I was in school I learnt very quickly how annoying a poorly made riving knife could be- I once got stuck half way through a cut because the riving knife was thicker than the blade.
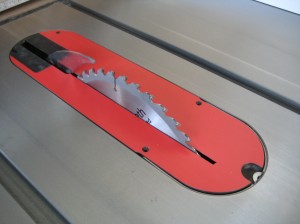
The riving knife is what I use during most cross cuts, I never use the saw without at least the riving knife in place.
The throat plate
I find the throat plate finicky to put in place quickly. I’m used to home made throat plates that don’t require much more than dropping it into place. I haven’t gotten used to it yet. I love the set screws easily accessible from the TOP of the insert, saving lots of time when adjusting it flush with the table top.
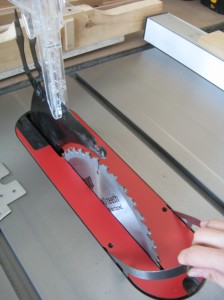
It has a handle! I often don't quite get it registered in the back and the plate skews because it is split most of the way down the plate. One half of the back will lie flush and the other will get hung up on a screw and be 1/4" above the table. Then I start again.
I’m not sure how home made inserts will stand up to having a slit all the way up them, but I imagine if they are made out of a similar material (some kind of composite plastic) the inserts should do fine.
The fence
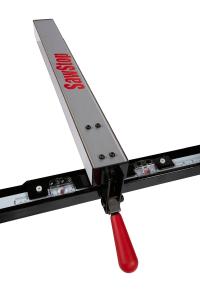
I have a 30″ premium fence. It’s the bottom of the line for Saw Stop 1.75hp saw and it’s actually not too bad at all. I wouldn’t mind having something heftier, but otherwise I enjoy the smoothness of it’s glide, it’s adjustable in all the ways you need, and it does the job. I haven’t found it lacking. On an aesthetic level the silicone handle tends to get really dirty.
The miter guage
I like that the miter gauge has two slots for screws instead of two holes where you would attach a sacrificial fence. This saves a lot of time.

I leave screws and washers in the sacrificial fence and attach and detach it from the mitre gauge as needed with a turn or two of the screw driver.
I don’t like using the miter gauge very much though, sometimes the weight of the fence I attach to it is enough to tilt the fence as I push it into the blade and the sacrificial fence will sometimes end up bumping to a stop on the edge of the table. It’s not fun to then begin lifting the gauge as your work piece is half way through the blade.
Dust collection
I have not upgraded to having a dust collection at the blade guard, this would solve a lot of the dust coming out at the operator. I also don’t have a super powerful dust collector, so that may also play a part. One really nice feature about the saw stop is that it has a shroud underneath the blade so that most of the dust that drops below the table falls directly into a dust collection hose. No more giant heap of dust to sift through if/when you drop the nut when changing blades.

I have just barely coated the inside of my table saw with dust. Most of the dust gets neatly sucked away BEFORE it can pile up in the table saw base.
The brake cartridge
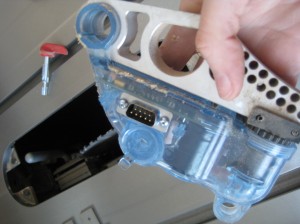
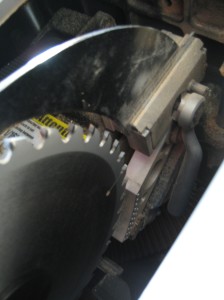
When I do get a dado stack, it isn't that hard to swap out the brake cartridges. You simply turn a red lever, pull out the pin, then pull out the cartridge.
It doesn’t take that much time to remove the brake cartridge, but at the same time I haven’t done it many times. It seems awkward to get a hand that deep into the gullet of your saw (half way below the blade). Also I feel terrified of damaging the cartridge. The manual does say to be careful not to hit it.
The mobile base…
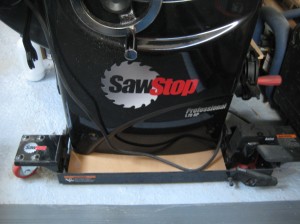
The base that came with my saw lets me roll the saw away from the wall if I need to with just the push of a foot it's up on it's wheels.
A place for everything…
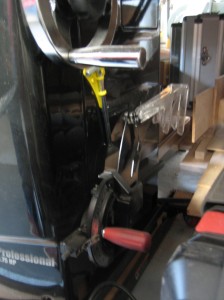
I'm glad to have this storage caddy, it makes my life simpler to have a compact place to put away each accessory and tool that belongs to the saw stop. On the other side of the table saw base there is a hook for the two blade changing wrenches, and a push stick that came with the saw.
Thanks for reading my review! Happy woodworking.

Congratulations on the new saw!
Nice review. I’m a bit annoyed that the “Premium” fence is actually at the bottom of the line… marketing! I like the new version of SawStop’s throat insert. While not quite as convenient as what you’re used to, it’s better than the original which requires a screw at the front to be removed.
Chris
Chris, LOL I would go crazy if I had to take out a screw driver to remove the throat plate! I’m glad to know they improve the product as they go then.
That’s by far the best review for that saw I’ve ever read. And I’ve read a bunch as I’m also considering getting one. Thanks! 🙂
Such a great compliment! I tend to shop for any and everything basing my decisions on customer reviews so I know how valuable the info is for other shoppers.
Agree with the other reply’s that this is a very nice review. My main concern was the false alarm rate (when the wood contained too much humidity) but as i understood it it is not that sensitive and it can be tested in the bypass mode. I think this protection mechanism (it’s the only one i’ve seen until now) is very important. If it could avoid only one accident during it’s lifetime it would be more than worth the extra costs.
Unfortunately this system is not for sale yet in Europe (I’m living in the Netherlands) but as soon as it does i would certainly considering in buying one.
Well thank you! You should check out this website/review on the same topic- it’s very well done and there’s video!
http://www.newwoodworker.com/reviews/sawstoprv.html
and part two is
http://www.newwoodworker.com/reviews/sawstop2.html
Thank You, this review is extremely helpful.
I found even better information after writing my review here (scroll to the bottom of each page for a super comprehensive video tour of the sawstop):
http://www.newwoodworker.com/reviews/sawstoprv.html
There is a part two:
http://www.newwoodworker.com/reviews/sawstop2.html
Very nice review. I just got a Sawstop with the 3hp motor and a 36″ fence. I love it. I had used a Delta Cabinet saw for 10 years (without a blade guard nor splitter) and had never cut myself. I was always super careful. But I realized that as I became a more competent woodworker, I started to do things automatically and had a couple of close calls, mostly with kick-back. I started to become afraid of the saw so I bought a SawStop. I’m just as careful as I always was but now I’m just not nervous.
The saw is incredibly well engineered and they seem to have taken care of every detail. The instructions are amazingly clear with big 3-d pictures. Nothing has been left to chance. And it cuts like a champ. Just love this SawStop. I would recommend it.
And the issue with the government getting into safety is bogus. You have to wear seatbelts. Duh. Would you ride around with out them just to defy the government? I wouldn’t. But we didn’t have seatbelts for years and death rates from blunt trauma injuries was horrendously high. Yay government safety rules!