
Here is a video of my new shop in case the photos don’t do it justice!
Here is a video of my new shop in case the photos don’t do it justice!
I have been tweeting about my shop move but have not shared a single scrap of information about it on my blog- so here goes! From the beginning…
What to do…
In the early fall my mom made the decision to put her house on the market. This meant two things; we as a family would have to go through tons of belongings to help her make the eventual move, and I would need to find a new shop. My existing shop was sitting on her land- in one of two outbuildings. As you can imagine this set some things into motion.
I felt the best way to deal with the new-found dilemma of what to do with my shop was to be proactive. In the event of a quick sale I didn’t want to be stranded, and winter snow always literally blocked in my shop- so I had to figure things out quickly. I bounced between the ideas of storing my shop tools or finding a shop space. I didn’t like the idea of storing my tools too much because it would mean two moves, one into storage and one out to a shop when I did eventually find one. Even though it was the cheaper option I also wouldn’t be able to use my tools if they were piled into a storage unit. I reached out to a friend with a shop space to see if we could work something out. He unfortunately did not have the space for my tools, but through talking with him further, he suggested I ask his friend in the building about storing my tools. A meeting was arranged with said friend and a great opportunity arose- his friend had been tentatively looking for someone to rent 1/3 of his shop! We made plans for my move and to have the space I was to take over vacated. I was elated to come away with an actual shop space and not just storage. I was also glad not to have a car payment- because this extra expense could still be shoe-horned into my budget.
The move…
I moved on November 8th 2014. I was ever thankful to have lots of help that day, so all I needed to spring for was, pizza, a 5x8x5 u-haul trailer and the gas money for my sister’s truck. The u-haul trailer had a very low bed so things worked out- though we did have to take the wings off of the table saw in order for it to be light enough to lift. Moving day itself was pretty great, it was done within three hours and only the drill press had a tumble. I did have to make many trips with my hatchback to get wood, and other miscellaneous tools that were not priorities on moving day (ie. not heavy and easily moved by one person) during the following weeks.
The wall…
The next phase after the move was to build a wall to create more usable vertical space for both shops, among other reasons. The pictures below capture the progress I made during the months that followed- right up until present day!

Packing up my old shop.

My brand new shop right after the move.

Hauling 2x3s for the wall

The building begins.

And so began my first real construction project.

The ceilings are roughly 10′ high but 2x3s that were 10′ long were about double the price of ones that were 8′ long… so I went with my wallet.

The first sheets of drywall went up!

It felt pretty darn good to have half of the wall up.

I was running out of floor space to assemble my walls so I used the existing wall to hold my new studs.

I then very slowly balanced the wall while sliding it into place…I really should have had someone else to help at this point. I clamped temporary blocks in place to hold one end while I used tap cons on the other side to secure it.

The view from the other side of the “wall”

Finally I added in the last section and attached everything together.

I found out that drilling into concrete was difficult, and repeating had a definite tiring effect on the body- and drilling into the ceiling against gravity had a dusty sweaty hurty effect on the body. Ouch.

Please never… ever again.

I cannot claim that these walls are plum or true but I can claim they are more trustworthy than the wall opposite in this photo- which is pretty flimsy.

I never thought I had enough sheetrock with the first guestimate run, but little did I know I was one sheet shy- darn it.

Nevertheless I needed to make another trip to the hardware store to get plywood for french cleats and hardboard for the doors which I intended to custom build, so throw in another sheet of drywall why don’t you. I didn’t mind staggering the cost of the build along with the trips to the hardware store.

As agreed upon with my shop partner, the top of the wall just received some plastic so that light could pass through to the other shop. I got out my staple gun and went to town.

I was still moving things into the shop during the wall build, and at one point glass covered every surface- a rare sight in a wood-shop.

This was from my previous career as a glass-blower. I had some items that needed permanent storage so I brought it all over and packed it all up neatly into a corner of the shop.

Next up I had to fill the two gaping holes in my wall with something door-like

Doors did result after some cobbling together- but it wasn’t pretty let me tell you. I will never again attempt to build with accuracy using warped construction grade lumber.

I can’t say I will be in a rush to hang doors any time soon either, but lessons were learnt. Also youtube can make anything look easy.

As I mentioned on twitter- it took ALL THE TOOLS.

But finally there were doors, and they were hung- damn it.

Going against all reason the second door didn’t turn out as well as the first- it works though (that’s me not only lowering the bar, but leaving it there).

The final steps were to trim out the doors and wall. Mouldings are pricey so I thought the leftover hardboard cut into strips would suffice. I quite like it actually.

With the wall built it certainly looked bare- so I set to work right away with french cleats. I wanted a wall system that was changeable since I have no real idea if the current layout will work in the long term. The peg board can be lifted off of the cleat and placed elsewhere.

I also figured out really quickly that I needed to build cleats for bulky items that shouldn’t gobble up work-surface real-estate.

One last detail was the other side of my wall…It was not white and kind of darkened the other shop.

So I grabbed the can of paint I happened to have and brightened up the place.

Since the rest of the walls are white it also unifies the space again instead of drawing attention to a dark wall.

As a finishing touch I grabbed some items from my old shop and put them up on the walls to make the place more homey.

So this is where I am as of a week or two ago, now it’s time to work IN the shop!
So as you can see the dimensions are long and narrow, my new shop is roughly 10’x40′. I have a shop tour video to share in the coming days so stay tuned! Happy woodworking!
I have a couple of videos to cut together that I’ve just been sitting on, but in the meantime I would like to share some of the goings on at my work.
Since I last left off on the topic of my aerospace job (possibly already a year ago?), I had mentioned that I finally got a lateral promotion that I had been wanting alllll along! Yay! That lasted a good nine months or so. The unfortunate motivation I had for switching to yet another position was the development of carpal tunnel syndrome in my left hand. Yaargh. At the time my job was to transform an unearthly set of cabinets made of fiberglass, and aluminum hollow(ish) core panels by carefully adding veneer to all of the door and drawer faces, and then applying mouldings around each one and laminate on the backs of each. It was darned satisfying work to see those door and drawer faces turn into flowing grain. The carpal tunnel was a result of repetitively taping on moulding after moulding. I’m only thankful that my dominant hand seemed unaffected.
As I dealt with being on light duty work, Dr.’s visits and going to physio, eventually an opportunity to switch positions arose. I jumped on it. And thankfully I got the position. So for about three months I enjoyed another lateral promotion. Now I was working in a different building (read; posh, quiet, and bettererer). The job was completely different. I was reassembling the cabinetry and all of it’s many components AFTER the finish had been applied. It was ultra satisfying to work on the cabinets, as now the cabinets were a beautiful high gloss that brought out all of the wood grain and revealed what a top quality product it really was. And since the cabinets had been completely dismantled for finishing and painting, it meant putting everything VERY CAREFULLY back together in order to properly adjust each piece. Ducting, wiring, plumbing, lighting, appliances were all integrated into the process, and it’s amazing how it all went together. But this bliss didn’t last forever.
I got moved back to the initial building along with a bunch of other employees. Return to start, do not collect $200 as they say in monopoly. And suddenly I did feel like a game board pawn. Frustratingly I literally ended up filling a hole in the production, doing the very first job I had when I started my aerospace job. The very same one that was so unappealing to me that I’d had thoughts of quitting. I’ve been doing this job for several months now and thankfully there is a upside and a change in the works. The upside is that coming full circle has given me great perspective and of course skill. I now found it almost effortless to tackle this same job, and I felt like I had a chance to conquer a daemon in my work history. In so doing I didn’t feel the same angst about the job itself, but I did feel underappreciated. Thankfully the ups and downs of working for a large company still includes those ups.
Since I wasn’t happy about my lateral demotion, I took matters into my own hands. Another opportunity presented itself and I applied for the role of team leader (of which there are three total in my section). What followed was a roller coaster ride of interviews, long waits, and the job almost evaporating into thin air. Somehow the decision came back around and I got the job! Best of all it is an actual promotion. So I start next week on yet another adventure.
This may be my most important experience to gain thus far. My whole goal for working in aerospace is to gain valuable skills to then eventually confidently start my own business with. To be honest this management skill set scares me the most and yet it is the one that I may need the most as a future entrepreneur. For some reason I have an aversion to phoning people, and I think this job might desensitize me to that, and other such phobias I need to work on. Trying new job positions has always been scary to me, and yet every time I plough on ahead I end up feeling glad that I didn’t shy away. So onwards and forwards!
So this concludes my recap of my musical chairs career movement in recent months, and I hope to get around to working on cutting together those new videos soon- another thing I am slowly working on improving haha ( read; amateur video continues)! ‘Til next time happy woodworking, friends!
I recently bought a second hand patio set made of wood. The lounge chair was thrown in for free as the glue joints had failed and the chair had basically disassembled itself. So I loaded all the pieces into my car and salivated over the prospect of not only getting the chair for free but a new project to work on! Here is a video of how the glue up went.
Get it’s while it’s hot! The video is fresh off my computer!
I think this is the most comprehensive video I’ve put out yet, so why don’t you sit back and enjoy this cutting board build with me! It’s a whirl wind of gluing, planing, sanding and routing. But hold onto your hats for the final reveal! Is that too much hype? Probably. But go on, take a look anyway.
This episode is all about getting prepared for the big glue up. I wanted my pieces to all behave predictably, so I needed a way to align them all. Decisions were made, and carried out, and in the next video I will wrap up the cutting board once and for all!
Here is an official tour of my shop space at home. It is tiny (7’x11′), which makes my real shop (8’x16′) seem ginormous! I wonder how small you can go in terms of shop space! If anything I am realizing that if there’s a will there’s a way to fit woodworking tools into a space and make sawdust.
Oh and I definitely promise to pay better attention to the lighting in future videos.
Stay tuned for more videos on my woodworking experience. And more immediately stay tuned for more on the cutting board I’m working on.
I may not have had time to film while I was dimensioning my stock for the cutting board, but I put together a video that goes over the photos and a small clip at the end explaining where I am headed next with the project.
Discussing the projects at hand- a cutting-board and a sword handle(?!)
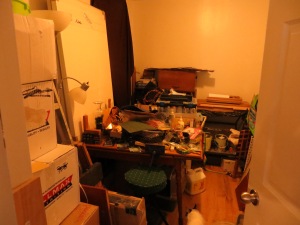
When we last left off I’d shared this scary photo of my work room. Thankfully it is a room transformed!

Step number one for my little work room was to reorganise the flow, I felt I was barricaded with the table in it’s previous orientation, and this layout felt SO much better!

The previous chaotic state of my work room had me looking for a LARGE storage unit for some leftover boxes, paints, and tools. I scored this wardrobe second hand for $100

In this room I am determined not to install anything permanently because I will most likely have to move my tools out and re-purpose the room, so free standing furniture helped sort out my storage needs.

On the other side I have a scroll saw set up on top of a cabinet that I’d saved from a curb a while back.

I decided to put most of my precious tools in this drawer. Out of sight but easy to access

This table is serving as my bench, it has splayed legs witch helps a little but I may need to anchor it somehow because it travels when I plane boards. I may just try rubber cups under the feet.

Here are the contents of that tool chest atop my bench. Note the hand embroidered super man swatch of cloth top right- somehow this makes it into my home tool area everytime. I made the thing in high school and darn it if it doesn’t make me feel super.
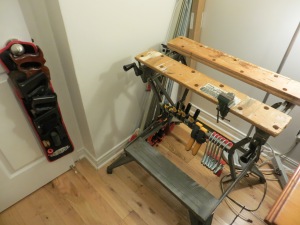
I have this workmate to help clamp up workpieces. I had to spend a good couple of hours fixing one of the vise screws (perhaps I’ll post the kludge)

And most recently I decided to paint the walls because I couldn’t stand the blue tinged white- hardly welcoming. And this is my home after all!

This room actually faces a window directly opposite and I feel a bit odd opening the blinds, so I put up privacy film so that I could still enjoy the meagre daylight that this room receives.

Here is my little work room after painting the walls a buttery colour. I’m glad I finally have a room to work in- and it sure took longer to organise that I thought!

But wait there’s more! After/during sorting my room, a couple of projects presented themselves. The lack of room for a bedside table on one side of the bed led to building a shelf for the spot between the two sconces pictured above.

I found some small boards well suited to the job and roughly jointed the mating edges. I was going for a rustic look and so I wasn’t concerned with planing the faces. I try to remember that before I became a woodworker I thought gaps in joints were more authentic looking, and tool marks added character- something that we are taught to avoid at all costs as woodworkers!

Here’s the shelf in place- finally a place to put a water glass!
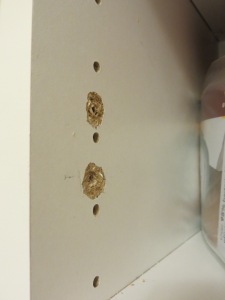
Project number two was to reinforce my bathroom wall cabinet’s hinges. The particle board was failing, and the doors were in danger of falling off.
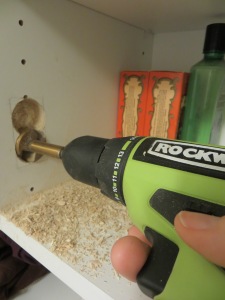
I removed material so that I could glue in solid wood blocks.

Once the glue set up I put my hinges and doors back up and revelled in the result.

Also- I installed two “cat shelves”! It’s a thing! Who knew this would make cats happy. They also help give a leg up to higher surfaces. I took pity on my cats when I found them cowering atop my bedroom dresser when my nephew and neice visited during the holidays.
That wraps up what I’ve been up to during the last month or more. I hope to get some REAL woodworking going now that my work room is ready. Happy new year and happy woodworking to all!
