Archive | woodworking blog RSS feed for this section

I have a tool habit… and I work with geniuses

6 Apr

Hey friends! I have more on tools today! I bought a little box of goodies from Lee Valley again. I also worked on my dust collection system, and I have a little bit of genius jury rigging to share with you from work.

First up; dust collection! I am a little annoyed to admit that I’ve bought a bunch of dust fittings that for some reason are not made to fit to standard sized vac hoses or the dust ports of my machines. Even the dust separator lid I’d bought had some weird sized fittings. So I finally had it out with all these fittings and cobbled together solutions for ALL of the machines I’d bought them for!

I've been carefully avoiding large chips with my vacuum because they clog the 1 1/4" hose very easily.

I’ve been carefully avoiding large chips with my vacuum because they clog the 1 1/4″ hose very easily.

Well I finally found a solution and cleaned the entire shop.

Well after a near melt down, I came to  a solution and cleaned the entire shop.

So I bought the lid a while back but only got around to modifying it recently. The fittings were stepped and I had to cut off the smaller steps to get my hoses to fit.

I bought this dust separator lid a while back and have finally got it hooked up. The fittings were stepped and I had to cut off the smaller steps to get my hoses to fit. I used my  bandsaw to slice the steps off, then followed up on the edge sander. Now everything fits!

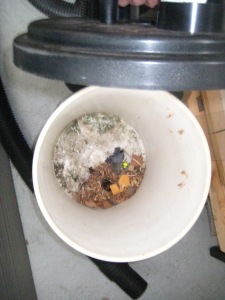
It's hard to make out but there are all kinds of debris in here that easily would have clogged my vac hose! Now I have to come up with a solution to keep the bucket from tipping over every other second. I'm thinking of making a rolling base that will hold my shop vac and the separator.

It’s hard to make out but there are all kinds of debris in here that easily would have clogged my vac hose! Now I have to come up with a solution to keep the bucket from tipping over every other second. I’m thinking of making a rolling base that will hold my shop vac and the separator.

And here’s a bit on what I bought from Lee Valley:

I finally bought a set of guide bushings for my router, and an inlay kit while I was at it.

I finally bought a set of guide bushings for my router, and an inlay kit while I was at it.

I was rather disappointed with the small size of this package, but at least it will give me a start on practicing my marquetry. And I have the lamp shade in line as my next project.

I was rather disappointed with the small size of these veneer sheets, but at least it will give me a start on practicing my marquetry. And I have a lamp shade project in mind for this that I’ll start on soon!

Can't say I'll buy these scraps again though.

Can’t say I’ll buy these scraps again though.

Okay so ever since I saw a video of Frank Klausz cutting a mortise with one of these I knew I would need to try it myself.

Okay so ever since I saw a video of Frank Klausz cutting a mortise with one of these I knew I would need to try it myself.

And finally I was at work yesterday and I was simply dazzled by a jig my co-worker had made. I asked him if I could take photos and he was happy to share his idea. EVERYONE should build one of these!!!!

Check out this edge trimming jig! There is even thought put into deflecting the chips with a piece of plexi-glass

Check out this edge trimming jig! There is even thought put into deflecting the chips with a piece of plexi-glass

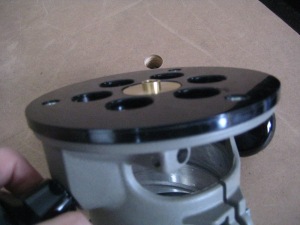
Here you can see the router bit, which has a bearing and is lined up just a hair below the surface of the mdf fence.

Here you can see the router bit, which has a bearing and is lined up just a hair below the surface of the mdf fence.

From the side you can see that the mdf is relieved from the mdf right where the edging rides up against the router base

From the side you can see that the mdf is relieved with a groove right where the edging rides up against the router base

So if you didn’t already notice the last photo shows it very well, the whole jig is made with the edge guide that comes with your router! Simply screw on a piece of mdf that you’ve made a hole in for the bit, and a groove in that allows the edging to pass freely by the fence, and voila! The perfect edge trimming jig. I couldn’t get enough of his demonstrating  how easy it was to use, he barely had to lift a finger and his edge was knocked down to a hair above the surface.

Woodworkers are a clever pack of friendly creatures.

Moving on up…it’s a scary business

27 Mar

The dynamics at my job have changed for me quite a bit in the last couple of months. While I’ve stayed in the section that builds the galley kitchen of the plane, my actual position has switched around several times. I started off about a year and bit ago building the drawers of the galley, then moved on to building the galley structure above the counter. That first switch kept me from quitting, so it was a welcomed change. More recently I changed positions again. I still work on the structure above the counter but now instead of building from scratch, I’m fitting and fine tuning elements. It takes a lot of patience and precision, but I really like it. I’ve found it to be a huge contrast to my two previous positions where I had to be precise but build quickly and do quite a lot of heavy and messy work.

And finally to current day, where I’ve  signed on to learn yet another position. It’s the position that follows the one I work on now. I will be adding the veneer and wooden moldings to the structure above the counter. When I originally started working in aerospace this is the type of position I was after, so I’m quite pleased that it’s only taken a year and a bit to get here. I had graduated from woodworking school a mere 6 months before snagging this job and had only accumulated 6 months of woodworking experience in the interim. This all meant that even though I had wanted a veneering position straight off the bat, I certainly wasn’t going to beat out people that had years of experience over me. And the company wasn’t going to take it on faith that I was a good worker. I’m actually glad to have had the experience of the previous positions, because it has given me a more broad understanding of the process. Plus I have slowly but surely proved myself at work through consistency and by showing up to work everyday with the intent to do my best. Mistakes happen, but the intent was there. There are people many that show up to work with the intent to do the minimum required of them, and their mistakes turn out worse as they come from a place of apathy.  The good news it that I will be in great company for my new position. No apathetically inclined individuals work there.

I have to say that my experience working at a large company has proven invaluable. It has been at the same time terrifying and liberating to have the ability to change positions frequently. Terrifying because it is out of my comfort zone to keep diving head first into the unknown, but liberating because I have found that each new change has brought rewards with it. And so I will keep trying to say yes instead of no when new opportunities arise at work. Though this hasn’t translated to every aspect of my life, I see now that it probably should, and maybe I’ll work on that!

The mock up… rebuilding my pride

24 Mar

So I wanted to dust this blog post under the rug because I messed up (to a degree) on some of my table joints.  My execution was darned sloppy and I was a little frustrated because technically speaking it should have worked. I set up my table legs at the drill press with stop blocks and clamps and drilled for the mortises.

A mortise should live within these lines

A mortise should live within these lines

So far so good

So far so good

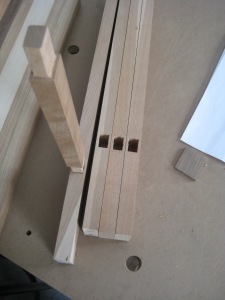
And somehow my set up let the forstner bit travel outside the lines.

And somehow my set up let the forstner bit travel outside the lines. I’m still trying to figure out if my setup failed, or if my drill press is somehow out of alignment.

The perfectionist in me wanted to reverse time and/or restart from scratch. But alas I just had to deal with it. So I did my best to square them up with chisels

The perfectionist in me wanted to reverse time and/or restart from scratch. But alas I just had to deal with it. So I did my best to square them up with chisels

As it stands now I still have quite a bit of fitting left, but the good news is that the shoulders of the rails should cover up any trace of the mishapen mortises! Hooray for that!

As it stands now I still have quite a bit of fitting left, but the good news is that the shoulders of the rails should cover up any trace of the misshapen mortises! Hooray for that!

I was glad that I'd only tackled the joints for one table and so I can try to better my performance on the next two tables! After I fit the disgraceful batch of joints I'll tend to these dovetail joints next.

I was glad that I’d only tackled the joints for one table and so I can try to better my performance on the next two tables! After I fit the disgraceful batch of joints I’ll address these dovetail joints next.

Since I need a little motivation to get over my goof I decided to roughly assemble the table to see how it will eventually look. oooh I can't wait! I DO look forward to getting on with it now.

Since I need a little motivation to get over my goof I decided to roughly assemble the table to see how it will eventually look. oooh I can’t wait! I DO look forward to getting on with it now.

And finally here is the view from sketch up that I originally planned. Looks good so far, but I still have a lot of joints to figure out as I go. Not sure how I want the top to attach or even the drawer!

And finally here is the view from sketch up that I originally planned. Looks good so far, but I still have a lot of joints to figure out as I go. Not sure how I want the top to attach or even the drawer!

It’s funny how something that actually won’t end up effecting the finished piece and won’t be seen can really nag at a woodworker. I feel like a soccer player who has built up their performance and then ends up scoring on their own net. Boo.  Thankfully I conclude this blog post with a positive mind. Everyday at work I take pride in making the least amount of mistakes possible. But when I do make minor slip-ups I work my hardest to rectify matters and move on. So I will try to do the same here! I look forward to completing this table and NOT pointing out any of the mistakes future onlookers when they view the finished piece.

Norm Abram and his dadoes…

19 Mar

I’ve been watching a lot of New Yankee Workshop of late. The show is addictive. I admit I really only watched it back in the day, so I have tons to catch up on. Lucky for me! I would LOVE to own the complete series, but it costs 3K. All of us Norm lovers should get together and find a way to get a box set in production for the average consumer’s budget.  I think if it was available it would fly off the shelves. After rekindling my love for the show decades later, I also found a second New Yankee workshop book at a thrift shop to add to my library;

http://www.amazon.ca/Mostly-Shaker-From-Yankee-Workshop/dp/0316004758

if you’re interested this is the first book I acquired a year or so ago:

http://www.amazon.ca/The-Yankee-Workshop-Norm-Abram/dp/0316004545

All this to say- I’ve been watching Norm work away and I noticed that dadoes are a favourite of his. And I can’t fault him on that, dadoes and grooves are very useful in so many situations. I’d actually like to incorporate more of them into my projects. Usually I’d use a router, simply because I don’t yet own a dado set. But I have to admit I envy the simplicity of dadoing on the table saw and I recall how useful dado sets were during my schooling. I think a dado stack is in my near future. But of course because I have a SawStop I also have to factor in the cost of a dado brake cartridge and a zero clearance insert. It will be a costly addition to the shop, but I’m certain I won’t regret it. Now the question is which dado set should I go with? I want to make sure I have a good set that doesn’t leave steps in the cut, or tears through the cut resulting in excessive blow out.  Anyone know of a reliable set for clean flat-bottomed  dado cuts?

The long lost project

13 Feb

I headed back to the shop this weekend as planned and worked on an ongoing project. A project that keeps getting set aside! So much so that I realized the other day that I started this project about a year ago! Wow. I feel terrible! Oh well, life goes on, and this project is back in my life, so there’s hope for it yet!

I found a proper storage place for my workpieces out of harm's way under my bench. My intent was to keep them from getting dinged, but I also kind of forgot about them- oops!

I found a proper storage place for my workpieces out of harm’s way under my bench. My intent was to keep them from getting dinged, but I also kind of forgot about them- oops!

My shop is currently tucked away under a hefty amount of snow. The layers have some ice mixed in, so I didn't even bother shoveling a path, I just slid into the shop and climbed out.

My shop is currently tucked away under a hefty amount of snow. The layers have some ice mixed in, so I didn’t even bother shoveling a path, I just slid into the shop and climbed out.

My goal for the day was to dive back into the table project. Three in total. Specifically to continue marking out joints. I had drawn up some sketchup plans of the tables, with rough measurements- but still had to calculate where each tenon and mortise would go.

And a dovetail in the example above! I found my toolclad table saw cover came in handy during this stage of my project! I was about to draw out a dovetail and needed the angle to set my sliding t-bevel and voila! I had my angle set in no time.

And a dovetail in the example above! I found my toolclad table saw cover came in handy during this stage of my project! I was about to draw out a dovetail and needed the angle to set my sliding t-bevel to and voila!

I also used the grid and scale on the toolclad cover to help me orient my parts and keep them square . I’m a fan of relative measurements as they really help to keep things fool-proof.

By the end of my visit I was successful in marking out at least four joints on each table- many more to go- but honestly I have yet to decided what some of the joints will be! I'll start with the ones I do know.

By the end of my visit I was successful in marking out at least four joints on each table- many more to go- but honestly I have yet to decide what some of the joints will be! I’ll start with the ones I do know.

Next visit I’ll be working on cutting all of the joints I marked out. I’m excited to see these parts come together! I’ve known them for so long in their flat-packed state that I was beginning to think they were going to remain that way! Piles no more I say- time for these sticks of wood to transform into furniture! Stay tuned for more joinery magic. ‘Til then, happy woodworking.

Projects of every colour

14 Dec

I’ve been working away on projects – but unfortunately I haven’t had as much time for woodworking projects of late!

Projects outside the shop:

I have a really old car- one that I may have to retire in the coming years. I decided to convert it into an art car to see it out with a bang.

I have a really old car- one that I may have to retire in the coming years. I decided to convert it into an art car to see it out with a bang.

I picked up some white paint markers and researched what I wanted to put on the car, and then I set felt tip to enamel paint.

I picked up some white paint markers and researched what I wanted to put on the car, and then I set felt tip to enamel paint.

My goal is to cover most of the car with animals.

My goal is to cover most of the car with animals.

I've since set down my marker as the temps had me shivering as I worked... but the project will be ongoing.

I’ve since set down my marker as the temps had me shivering as I worked… but the project will be ongoing.

I also was working on this for quite a while, and finally wrapped it up a few days ago! I look forward to having more time for the shop now that my focus is shifting back towards woodworking.

I also was working on this for quite a while, and finally wrapped it up a few days ago! I look forward to having more time for the shop now that my focus is shifting back towards woodworking.


In fact…

I have this cheap ikea lamp that has been broken for ages- and yesterday the superglue failed and I had to tape it together...

I have this cheap ikea lamp that has been broken for ages- and yesterday the superglue failed and I had to tape it together…

...I kept it just to have the cylinder as a sample and thought maybe I should make a veneer replacement! Perhaps with marquetry if the curve allows. So now I have it in my mind that I am going to save this lamp and make it 100x better!

…I kept it just to have the cylinder as a sample and thought maybe I should make a veneer replacement! Perhaps with marquetry if the curve allows. So now I have it in my mind that I am going to save this lamp and make it 100x better!

What little I have accomplished in the shop:

My mom has a stool that failed recently. The upholstered seat broke down the middle.

My mom has a stool that failed recently. The upholstered LDF seat broke down the middle.

So it was my job to build a replacement seat.

So it was my job to build a replacement seat.

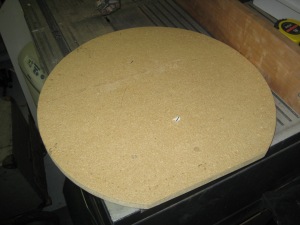
I started by pushing the two pieces of the seat as tightly together as possible to trace duplicates, then I cut out the plywood blanks on the table saw.

I started by pushing the two pieces of the seat as tightly together as possible to trace duplicates, then I cut out the plywood blanks on the table saw.

Next I cut out the curves...

Next I cut out the curves…

...at the bandsaw

…at the bandsaw

And finally I smoothed the bandsawn circle and I broke the edges so that the seat wouldn't feel uncomfortable.

And finally I smoothed the bandsawn circle and I broke the edges so that the seat wouldn’t feel uncomfortable.

Here's a picture of the stools to five you and idea of the finished product!

Here’s a picture of the stools to give you an idea of the finished product!

You may have noticed that I milled up two seats- that is because the stool is part of a set and I expect the other seat might fail somewhere along the line so I wanted to mill both at the same time to save myself the hassle later on! I would have replaced the other seat right away (before it fails!) except I couldn’t face all those staples again. By the time I had removed the staples from the first seat, mill up the seats, re-upholstered the seat and reassembled the stool, I was too tired to repeat the process for the second stool.

The holidays are coming and am every so pleased that I get about two weeks off from work. And while I expect a lot of visiting with family and friends I also plan to make some time to visit my shop and work on some shop fixtures that have been nagging at me- and some much needed woodworking projects. Stay tuned! Happy woodworking and happy holidays!

Hand-me-down tools!!

3 Dec

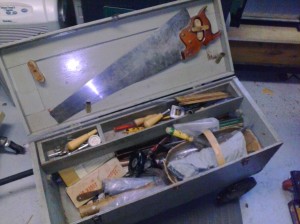
This weekend I scored some nice hand me down tools! My grandmother was holding on to my grandfather’s tools for quite some time it seems! I had no idea, and was ever so delighted to receive the “treasure”.

The new to me tools even came in a tool chest. It was too heavy for one person to lift!

The new to me tools even came in a tool chest. It was too heavy for one person to lift!

What goodies live in here?!

What goodies live in here?!

Some rasps and files in pretty good condition.

Some rasps and files in pretty good condition.

The tins are full of drill bits.

Some tins full of drill bits.

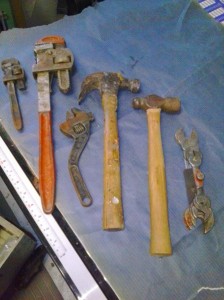
Not as handy for woodworking, but pleased to have these none the less.

Some nice hammers and wrenches.

I have a spoke shave from my dad, but this one has much less rust and will need less tuning

This spoke shave which is in better condition than the one I got from my dad.

hoo boy I will need to tune these up quite a bit, but I look forward to finding out if they keep an edge well!

hoo boy I will need to tune these up quite a bit, but I look forward to finding out if they keep an edge well!

For measuring and tapping holes with threads.

For my fine measuring and hole tapping needs.

Super pleased with the sliding t-bevel as I only had a cheapo plastic one from my dad. The tightening lever isn't optimal but I can live with it.

Super pleased with the sliding t-bevel as I only had a cheapo plastic one from my dad. The tightening lever isn’t optimal but I can live with it.

I'll need to tune the drill but it came with a wide assortment of bits- very interested to see how well it works when it's tuned.

I’ll need to tune the drill but it came with a wide assortment of bits- very interested to see how well it works when it’s tuned.

I really needed these!

I really needed these!

I've been wanting the rebate plane below for a while- who knew my grandfather had one! I feel like it was meant to be! I have to buy a knicker for it but it seems to have the other parts

I’ve been wanting a rebate plane like this for a while- who knew my grandfather had one! I feel like it was meant to be! I have to buy a knicker for it but it seems to have the other parts

I hear all three of these lovelies. I had a broken heart over my aunt getting the other saw that went with this one.

I heart all three of these lovelies. My aunt had dibs on the other saw that went with this one- I wish I could have kept them both!

My grandfather kept a bag of something in the tool box that prevents rust, so I’m pleased that most of the tools are in good  condition especially for having spent years/decades  out in a humid/unheated  shed. I feel like a kid in a candy store. I don’t prefer tool chests, but I will probably find a place to keep this one simply because it was my grandfathers and it’s instantly sentimental for me. Who knows maybe the tool chest idea will grow on me as I use this one.

Verdict is in…

17 Nov

….annnnnnd I have a white card! As of yesterday I accepted the offer to become a permanent worker- I’ll sign officially in a week or so.

Yehoo! For the first time in my life I have a secure job with benefits- for as long as I want it. Although most of my artist friends look down on my “factory job”  in Aerospace, I can’t help but feel proud of the accomplishment, and feel a bit giddy at some of the freedoms it will give me. It’s no ordinary factory job, there are no conveyor belts etc., we’re doing custom work in a more cozy setting . I have a calm and safe workplace, I build something that I’m proud of, and I’ve made some good friends.

What will become of me now!?

My original plan was to work at least two different jobs in the woodworking industry to diversify my experience and I’ve done that.

I also planned to work to buy tools. And I’ve done that. (and frankly there’s no end to the tools, but I have a great foundation now)

Next I planned to slowly but surely build a customer base by making furniture on the side. I wanted to start my business with the least amount of risk. That’s where I’m at now.

The goals stay the same but some are gaining priority…

The problem is that the third and final phase of my plan I’ve found to be a bit flawed in practice. I don’t have the energy to tackle full scale furniture projects on a deadline. I need to work at a leisurely pace, and still have time to live outside the shop. My first commission was a trial run that proved difficult on my everyday life. To make matters more complicated some of life’s other priorities have crept in- having a family and home-ownership are bumping my woodworking business plans down a peg or two.

The revised plan

I still plan to start my own woodworking business, but I want to put less pressure on myself and say that it happens when it happens. I need to actually discover what my niche will be- which I’d like to come to in a natural way by experimenting. I would hate to start hastily by doing the first thing that comes to mind and then get pegged into making a particular product that I didn’t even feel passionate about. The world feels full of possibility again!

Let the experiments begin!

Klingspor to the rescue… again!

4 Nov

As I mentioned earlier, I bought a Ridgid combination spindle sander/ belt sander recently. I had decided that it was a necessary tool. I’ve worked with belt sanders at both of my jobs in the woodworking industry and they shave so much time off of certain tasks that I finally convinced myself to just make room in the shop for it.

So I made the room.

While I was at it I picked up replacement sanding drums and belts. That way I’d be prepared with different grits, and fully loaded for my upcoming projects. I’ve already used it so much that I feel the tool is worth it’s weight in gold.

To my chagrin the belts that I bought at Homedepot (Freud Diablo brand) were loose even after sliding the tension lever all the way home. This led to the belt flapping about and then sliding down and sanding the inside of the machine! I promptly turned off the sander and adjusted the knob that repositions the belt up or down the assembly. This didn’t help the situation at any point because the belt was too loose. The package said it was the right size 24″x4″. Yet when I put the original belt(that came with the sander) back onto the machine it tracked perfectly with no problems- I knew then that it wasn’t my machine. So back to the store the belts went for a full refund.
I recently bought sanding discs for my ROS (random orbit sander) from Klingspor so that’s where I turned next. I did some quick internet research to see if other Ridgid belt sander owners had used Klingspor belts successfully. I did find confirmation of that so I ordered some belts. I received the belts a week or so ago and tried them out- worked perfectly!

The most amazing part is the deal I got! I’m glad the first belts went back to the store because  just 2 belts had cost $12. Klingspor offers a deal on a combo pack of  30 belts for $20 (6 assorted grits). I still can’t believe what a great deal that is! I’ll be sanding for a long while on those 30 belts! They appear to be better quality than the belts I got from Homedepot, plus I have a crepe stick to clean the paper with, so I’m all set. Thanks Klingspor!

Now I have 5 of each of the following grits: 60,80,100,120,150,180.

Next thing this sander needs is a dust shroud,  which the machine doesn’t come with, nor does the manufacturer produce one. Luckily I found one that Kevin May made here. It seems perfect so I’ll probably just model mine after his as closely as possible. Kevin’s shroud design is easily removed, and also has a hinged part that swings out of the way to access the spindle end of the edge sander without removing the shroud.

On the job front I am sill twaiting for the final word, things are tense. I should know sometime this coming week- possibly Monday- but I’m trying not to hold my breath!

P.S. Klingspor  sells more than just sandpaper!

Finally, my shop has a dust separator! I bought one that fits regular sized buckets because I happened to have one on hand. I wasn’t ready to fork over $60-$90 for a Dust Right or Oneida version, so this $15 lid fit the bill very well. Can’t wait to try it out.

A visit from the ergonomist…

10 Sep

One of the benefits of working for a big company is that they hire all kinds of professionals to help the company improve. In this case we had a visit from an  Ergonomist. She held a workshop and then followed each of the attendees for half hour sessions to observe how we worked and to suggest improvements.

The workshop was a two hour lecture on the body and possible problems we might run into while working a physical job. Tendonitis, hernias, sciatica flare ups, and carpal tunnel syndrome among them. The point of the lecture being that we often don’t listen to our bodies, and move in very detrimental ways that lead to all of those aches and pains that can become long term problems. We often push ourselves too hard, put ourselves into awkward positions because we ” just need to get this one thing done”, and ignore aches and pains until it’s too late. We also give excuses as to why we might be sore, “oh I must have slept on it wrong” etc until we have entirely dismissed the proper source of the problem.
Now a lot of the solutions are answers you might think can be found through common sense. But if you had an ergonomist follow you for a period of time  in the shop I bet you’d find you were guilty of some  infractions! I tend to break the laws of good ergonomics often, which explains why I’m experiencing a lot of aches and pains. But I’ll share what I learned on the topic, and hopefully this can help!

Preventative Tips to less aches and pains :

-Keep your center of gravity in mind( ie. if you’re leaning forward, move your legs to support that action)

-Move with your whole body and not just your arms

-Keep your arms close to your body whenever possible to reduce exertion and straining your joints

-Grip with your whole hand and not just your fingertips

-Always point your body AND toes in the direction that you’re working

-Bend your knees while doing work that requires effort

-Take mini-breaks (15-20 seconds every now and then) during demanding work especially if the task has caused you pain in the past

-Let go of your tool often and change your hand positions often

-Whenever possible try to only bend your body in one direction at a time (ie. if you pick up a box on the floor and bend over and twist at the waist, that’s two directions)

-Actively double check your body position during a task and ask yourself if you’re in the most comfortable position

-Stretch before working, and at the very least stretch the body part you’ll be straining moments before you start a task.

-and finally assess whether there is another  tool, technique, or angle to use, or  another way to raise, lower, or clamp your workpiece so that  it will be in a better position for your body.

Treatment  tips for aches and pains:

-Number 1 is to listen to your body and at the first signs of strain try to work in another way that doesn’t cause the strain or pain to return. Once your body reaches a certain buildup of lactic acid in the muscles it can take up to 6 hours to release those toxins. Which is why when you attempt to return to a task that was hurting, you can endure it for shorter and shorter periods of time than the initial period that lead up to the pain.

-If you have tendonitis there is a band you can slip onto your forearm that gives your tendons support during strenuous activities (it’s important to only use it during strenuous activities because it doesn’t help tendonitis at any other times)

Compression bands can help tendonitis!

-If you sleep with your hand pressed against your face and experience wrist pain, you can buy special gloves that keep your wrists straight as you sleep.

Use heat on knotted muscles to help them relax

Use ice on tendons and joints to help reduce inflammation.

-Stretch the aching area to release toxins

-Rest the area and try to avoid using that body part even in every day life whenever possible(use a less dominant hand for instance)

Tug of war

Of the suggestions and tips above, I do follow some willingly and others seem to be a struggle to put in action.

At work there is a fitness instructor that visits daily at the beginning of each workday to put us through various stretches. This is on a volunteer basis, it is not mandatory, but really it should be. I found myself attending these stretching sessions about two months ago and have made efforts to go every day since.  I’ve never thought much of stretching but I’ve found it really has helped.

Here are some common stretches for problem areas:

For the Back

Lie on the ground with your arms spread out, take one leg and cross it over your body and let it down onto the ground and relax it keeping your torso flat against the ground.

Slowly round your back by slumping forward and letting your head drop towards your body. Continue rounding your back downwards one vertebrae at a time. Stop at any point where you feel the most tension and hold the stretch there. Then slowly rise back up one vertebrae at a time

Lift your leg to your chest and hold it there with your arms. Repeat with the other leg.

For the neck

Put one hand behind your back and lean your head to the side of your relaxed arm. The bring your relaxed arm up and put your hand on your head, but little or no pressure on your head with that hand. Hold for five seconds. Keep your head from leaning forward or backward during the stretch.

Another is to do slow semi circles with your head dipping low in the center and coming up to each shoulder, not forcing the neck, but relaxing it and feeling your vertebrae as you raise and lower your head in semi circles.

For the forearms

My points of contention…

So I stretch before work…  but I certainly have a hard time remembering to stretch just before strenuous activities, it may take a while to make progress there.

Also some of the simple tips such as changing hand positions often, and taking mini breaks seem to elude me. It’s difficult to interrupt work flow but I’ll try to make it more of a priority.

Bending in more than one direction is also a problem spot right now. I forget to reposition my stance if I reach for something diagonal to me on the bench, so I lean forward and twist at the same time. I feel this will improve over time.

The ergonomist specifically mentioned that I tend to bend my head down to take a look at my progress and suggested I move my workpiece closer or bend my knees instead of straining my neck. This one will take a lot of time I think. It just seems quicker to bend my head down than to reposition my workpiece every time. But now I’m aware of it and I will try to improve this point over time.

Do you recognize yourself in any of the examples above? I certainly did. I even noticed that I don’t point my feet towards what I’m working on even in everyday circumstances. I need to improve on MANY things!

Happy woodworking, ’til next time.